Introduction 1: Różnice pomiędzy wersjami
(→Help page, installing an off-line version) |
|||
| (Nie pokazano 4 pośrednich wersji utworzonych przez tego samego użytkownika) | |||
| Linia 4: | Linia 4: | ||
==Creating a Scratch account== | ==Creating a Scratch account== | ||
Enter the following Scratch address in the web browser: http://scratch.mit.edu | Enter the following Scratch address in the web browser: http://scratch.mit.edu | ||
| + | <p align="center">[[Plik:instr1_logo_scratch.JPG]]</p> | ||
We click Join Scratch on the top bar (join the Scratch community).<br /> | We click Join Scratch on the top bar (join the Scratch community).<br /> | ||
| + | <p align="center">[[Plik:instr1_plik1.JPG]]</p> | ||
A registration window opens, in the first step we fill in three boxes: | A registration window opens, in the first step we fill in three boxes: | ||
# Choose a Scratch Username – enter the desired username (not your first or last name, preferably a nickname). When we get to the second box if the name we have typed is already in use by another user, we will be informed that this username already exists (Sorry, that username already exists!). | # Choose a Scratch Username – enter the desired username (not your first or last name, preferably a nickname). When we get to the second box if the name we have typed is already in use by another user, we will be informed that this username already exists (Sorry, that username already exists!). | ||
# Choose a password – we enter the password, the system tells us to remember it and not disclose it to anyone (Remember it – don’t tell anyone else). | # Choose a password – we enter the password, the system tells us to remember it and not disclose it to anyone (Remember it – don’t tell anyone else). | ||
# Confirm password – we enter the password again. If the entries are not the same, a message appears telling us that the passwords do not match (Your passwords do not match). We should then enter the password again. | # Confirm password – we enter the password again. If the entries are not the same, a message appears telling us that the passwords do not match (Your passwords do not match). We should then enter the password again. | ||
| + | <p align="center">[[Plik:instr1_plik2.JPG]]</p> | ||
If all entries have been accepted, click the Next button in the bottom right corner.<br /> | If all entries have been accepted, click the Next button in the bottom right corner.<br /> | ||
| + | <p align="center">[[Plik:instr1_plik3.JPG]]</p> | ||
| + | |||
In the second step, we fill in information about the user: | In the second step, we fill in information about the user: | ||
# Birth Month and Year – select the month and year of birth from drop-down lists. In the information which opens when we click the question mark (Why do we ask for this info) we can read: We use this information to calculate the age range of people who use Scratch, and to confirm that you are the owner of the account if you contact us. Your birth month and year will not be made public. | # Birth Month and Year – select the month and year of birth from drop-down lists. In the information which opens when we click the question mark (Why do we ask for this info) we can read: We use this information to calculate the age range of people who use Scratch, and to confirm that you are the owner of the account if you contact us. Your birth month and year will not be made public. | ||
| Linia 15: | Linia 20: | ||
# Country – select Poland from the drop-down list. IV.E-mail address – we enter the e-mail address [students can enter the address of a parent or a teacher]. Explanation: We use it only in case you need to reset the password [receive a new password]. We won’t share it with anyone. | # Country – select Poland from the drop-down list. IV.E-mail address – we enter the e-mail address [students can enter the address of a parent or a teacher]. Explanation: We use it only in case you need to reset the password [receive a new password]. We won’t share it with anyone. | ||
<br /> | <br /> | ||
| − | ''Note: There is no need to enter real data, we only need an e-mail address to regain access to our account if we forget the password. In case of reluctance to provide personal details, we can skip creating an account and still be able to do our work. The disadvantage of working in this way is the need to store projects locally on our computer and lack of opportunity to share our projects with other Scratch users.'' <br /> | + | <span style ="color:red">'''Note: </span> <br/>''' There is no need to enter real data, we only need an e-mail address to regain access to our account if we forget the password. In case of reluctance to provide personal details, we can skip creating an account and still be able to do our work. The disadvantage of working in this way is the need to store projects locally on our computer and lack of opportunity to share our projects with other Scratch users.'' <br /> |
We click the Next button to finish setting up our account. In the last step, it is enough to click the OK Let’s Go button to go to the Scratch page. | We click the Next button to finish setting up our account. In the last step, it is enough to click the OK Let’s Go button to go to the Scratch page. | ||
| + | <p align="center">[[Plik:instr1_plik4.JPG]]</p> | ||
On the final sign-up screen we can read in sequence: | On the final sign-up screen we can read in sequence: | ||
| − | + | In the box: Scratch is a community of people of all ages, from all over the world. Make sure that your projects and comments are respectful and friendly. <br /> | |
| + | We can also click any of these links: | ||
* Learn how to make a project – opens a project containing help window tooltips (in English) on how to build scripts using blocks. | * Learn how to make a project – opens a project containing help window tooltips (in English) on how to build scripts using blocks. | ||
* Choose a starter project – opens a window with a set of projects prepared by the Scratch team and provides an encouragement: Look through these projects. Look inside, make changes and add your ideas. | * Choose a starter project – opens a window with a set of projects prepared by the Scratch team and provides an encouragement: Look through these projects. Look inside, make changes and add your ideas. | ||
* Connect with a Scratcher – displays a page with projects prepared by our Scratch users under the slogan: Welcome to Scratch. | * Connect with a Scratcher – displays a page with projects prepared by our Scratch users under the slogan: Welcome to Scratch. | ||
| − | ''Thanks for joining Scratch [community]. You are now logged in.'' | + | |
| + | ''Thanks for joining Scratch [community]. You are now logged in.'' | ||
| + | |||
== Using our Scratch account == | == Using our Scratch account == | ||
| − | When we click Sign in on the Scratch page a sign-in window opens. Here we must enter the user name and password we provided during the sign-up process, and then click Sign in. When we have signed in to our account in the main menu (the blue bar at the top) three new items appear: | + | When we click '''Sign in''' on the Scratch page a sign-in window opens. Here we must enter the user name and password we provided during the sign-up process, and then click '''Sign in'''. <br /> |
| − | * envelope – allowing us to move to the page Messages which contains information about comments on the user’s projects and other events associated with his/her activity on the Scratch page; | + | <p align="center">[[Plik:instr1_plik5.JPG]]</p> |
| − | * folder with the letter S – allows us to quickly go to the My Stuff page with a list of the user’s projects; | + | When we have signed in to our account in the main menu (the blue bar at the top) three new items appear: <br /> |
| − | * icon and username – contains a drop-down menu where we can select: | + | <p align="center">[[Plik:instr1_plik6.JPG]]</p> |
| − | ** Profile – access to the description of the user profile. Here we can enter user information (About me), and projects created by the user (What I’m working on). | + | * '''envelope''' – allowing us to move to the page Messages which contains information about comments on the user’s projects and other events associated with his/her activity on the Scratch page; |
| − | ** My Stuff – access to a page listing projects created by the user. | + | * '''folder with the letter S''' – allows us to quickly go to the My Stuff page with a list of the user’s projects; |
| − | ** Account settings – access to a page where our password and e-mail address can be changed. | + | * '''icon and username''' – contains a drop-down menu where we can select: |
| − | ** Sign out – sing out of your account. | + | ** '''Profile''' – access to the description of the user profile. Here we can enter user information (About me), and projects created by the user (What I’m working on). |
| + | ** '''My Stuff''' – access to a page listing projects created by the user. | ||
| + | ** '''Account settings''' – access to a page where our password and e-mail address can be changed. | ||
| + | ** '''Sign out''' – sing out of your account. | ||
| + | <p align="center">[[Plik:instr1_plik7.JPG]]</p> | ||
| + | |||
== Grouping projects (Studio) == | == Grouping projects (Studio) == | ||
| − | In the My stuff | + | In the '''My stuff''' window there is a list of projects created by the user. <br /> |
| − | The user can click on New project to create a project. He/she can also create a new studio – a place for grouping selected projects. Studio (formerly called the gallery) is a convenient place for the teacher where he/she can collect students’ projects. For this purpose we need to create a new studio, then: | + | <p align="center">[[Plik:instr1_plik8.JPG]]</p> |
| + | |||
| + | The user can click on '''New project''' to create a project. He/she can also create a new studio – a place for grouping selected projects. '''Studio''' (formerly called the gallery) is a convenient place for the teacher where he/she can collect students’ projects. For this purpose we need to create a new studio, then: | ||
* Click on the name, change it and provide it to students. | * Click on the name, change it and provide it to students. | ||
| − | * Check the box Allow anyone to add projects. | + | * Check the box '''Allow anyone to add projects''''. |
| − | * Click the Follow button to receive information about activity in the studio. | + | * Click the '''Follow''' button to receive information about activity in the studio. |
| − | Adding projects to the studio is very simple. On the list of projects we choose the Add to button and indicate the studio to which we want to add the project. Note: | + | |
| + | <p align="center">[[Plik:instr1_plik9.JPG]]</p> | ||
| + | |||
| + | Adding projects to the studio is very simple. On the list of projects we choose the '''Add to''' button and indicate the studio to which we want to add the project. <br /> | ||
| + | <br /> | ||
| + | ---- | ||
| + | <span style ="color:red">'''Note: </span> <br/>'''<br /> | ||
| + | a project added to the studio must be made available to other members of the Scratch community. For this purpose we need to click the button '''Share''' on the right side of the project. We can cancel sharing a project by selecting Unshare. | ||
| + | ---- | ||
| + | <br /> | ||
| + | <p align="center">[[Plik:instr1_plik10.JPG]]</p> | ||
== Help page, installing an off-line version == | == Help page, installing an off-line version == | ||
When we click the Help button in the main menu we can see a lot of materials which can help us in learning Scratch. | When we click the Help button in the main menu we can see a lot of materials which can help us in learning Scratch. | ||
| − | Some of the things we can find here: | + | Some of the things we can find here: <br /> |
| − | * Getting Started Guide – a guide in English: Getting Started in PDF format containing an introduction – the basics of using Scratch. | + | <p align="center">[[Plik:instr1_plik11.JPG]]</p><br /> |
| − | * Scratch Cards – work cards in English, with an introduction to building simple projects. | + | |
| − | * What's New in Scratch 2.0 – a description in English: What's new in Scratch 2.0 (compared to version 1.4). <br /> | + | * '''Getting Started Guide''' – a guide in English: Getting Started in PDF format containing an introduction – the basics of using Scratch. |
| + | * '''Scratch Cards''' – work cards in English, with an introduction to building simple projects. | ||
| + | * '''What's New in Scratch 2.0''' – a description in English: What's new in Scratch 2.0 (compared to version 1.4). <br /> | ||
| + | |||
On the right side in the Resources section there are links to additional Scratch resources (all in English): | On the right side in the Resources section there are links to additional Scratch resources (all in English): | ||
| − | * ScratchEd – portal for Scratch teachers. | + | * '''ScratchEd''' – portal for Scratch teachers. |
| − | * Scratch Wiki – a page with descriptions and guides prepared by Scratch users. | + | * '''Scratch Wiki''' – a page with descriptions and guides prepared by Scratch users. |
| − | * Scratch 2 Offline Editor (Beta) – allows us to install the 2.0 version of the programme on our computer. | + | * '''Scratch 2 Offline Editor (Beta)''' – allows us to install the 2.0 version of the programme on our computer. |
| − | * Scratch 1.4 Download – allows us to install the old 1.4 version of the programme on our computer. | + | * '''Scratch 1.4 Download''' – allows us to install the old 1.4 version of the programme on our computer. |
| − | * Scratch and the Physical World – a link to a description of possibilities for using external devices in Scratch (e.g. for controlling structures built of Lego blocks) | + | * '''Scratch and the Physical World''' – a link to a description of possibilities for using external devices in Scratch (e.g. for controlling structures built of Lego blocks) |
* ... <br /> | * ... <br /> | ||
| + | |||
It is easy to install an off-line version, but it requires a good Internet connection.<br /> | It is easy to install an off-line version, but it requires a good Internet connection.<br /> | ||
| − | After selecting the Scratch 2 Offline Editor (Beta) link on the Help page, we need to click the image SCRATCH2.0 INSTALL NOW. | + | <p align="center">[[Plik:instr1_plik12.JPG]]</p> |
| + | |||
| + | After selecting the Scratch 2 Offline Editor (Beta) link on the Help page, we need to click the image '''SCRATCH2.0 INSTALL NOW'''. <br /> | ||
| + | First '''Adobe AIR''' runtime system is installed, and then the programme '''Scratch 2.0'''. The programme can run on Windows, MacOS and Linux. The desktop version of the environment installed on our computer can run without an Internet connection, it works in the same way as the on-line version. | ||
Aktualna wersja na dzień 17:34, 6 lip 2015
Scenarios dedicated to primary school learners, 4th - 6th grade (basic level) These materials have been developed by Ośrodek Edukacji Informatycznej i Zastosowań Komputerów (Centre for Information Technology Education and Application of Computers) in Warsaw as part of the “Mistrzowie Kodowania” (“Masters of Coding”). Programme funded by Samsung Electronics Polska, licensed under CC BY-SA “Attribution – Share Alike 3.0”.
Spis treści
Using a Scratch account
Creating a Scratch account
Enter the following Scratch address in the web browser: http://scratch.mit.edu
We click Join Scratch on the top bar (join the Scratch community).
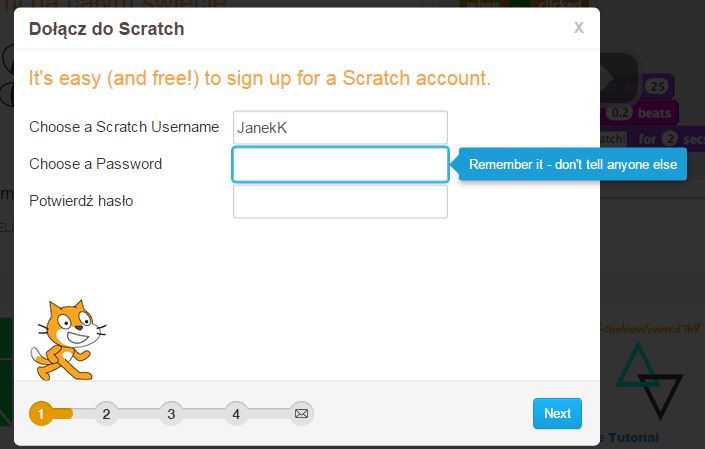
A registration window opens, in the first step we fill in three boxes:
- Choose a Scratch Username – enter the desired username (not your first or last name, preferably a nickname). When we get to the second box if the name we have typed is already in use by another user, we will be informed that this username already exists (Sorry, that username already exists!).
- Choose a password – we enter the password, the system tells us to remember it and not disclose it to anyone (Remember it – don’t tell anyone else).
- Confirm password – we enter the password again. If the entries are not the same, a message appears telling us that the passwords do not match (Your passwords do not match). We should then enter the password again.
If all entries have been accepted, click the Next button in the bottom right corner.
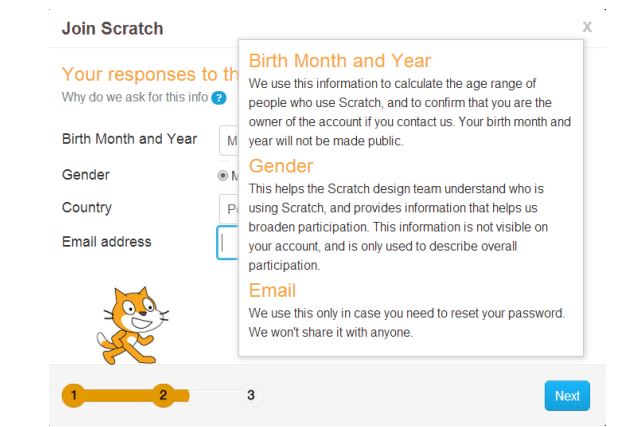
In the second step, we fill in information about the user:
- Birth Month and Year – select the month and year of birth from drop-down lists. In the information which opens when we click the question mark (Why do we ask for this info) we can read: We use this information to calculate the age range of people who use Scratch, and to confirm that you are the owner of the account if you contact us. Your birth month and year will not be made public.
- Gender – we should check Male, Female or the blank window (if we do not want to provide gender information). Explanation: This helps the Scratch design team understand who is using Scratch, and provides information that helps us broaden participation. This information is not visible on your account, and is only used to describe overall participation.
- Country – select Poland from the drop-down list. IV.E-mail address – we enter the e-mail address [students can enter the address of a parent or a teacher]. Explanation: We use it only in case you need to reset the password [receive a new password]. We won’t share it with anyone.
Note:
There is no need to enter real data, we only need an e-mail address to regain access to our account if we forget the password. In case of reluctance to provide personal details, we can skip creating an account and still be able to do our work. The disadvantage of working in this way is the need to store projects locally on our computer and lack of opportunity to share our projects with other Scratch users.
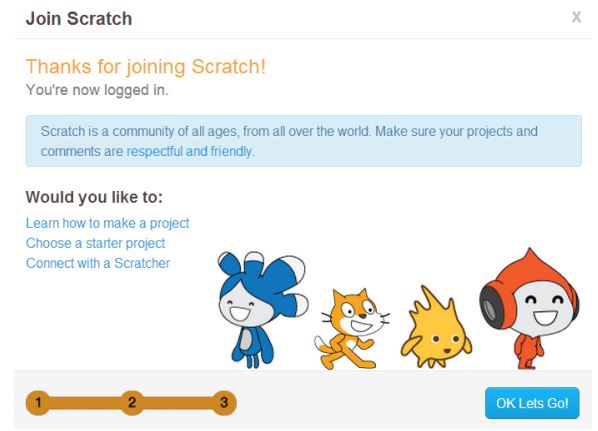
We click the Next button to finish setting up our account. In the last step, it is enough to click the OK Let’s Go button to go to the Scratch page.
On the final sign-up screen we can read in sequence:
In the box: Scratch is a community of people of all ages, from all over the world. Make sure that your projects and comments are respectful and friendly.
We can also click any of these links:
- Learn how to make a project – opens a project containing help window tooltips (in English) on how to build scripts using blocks.
- Choose a starter project – opens a window with a set of projects prepared by the Scratch team and provides an encouragement: Look through these projects. Look inside, make changes and add your ideas.
- Connect with a Scratcher – displays a page with projects prepared by our Scratch users under the slogan: Welcome to Scratch.
Thanks for joining Scratch [community]. You are now logged in.
Using our Scratch account
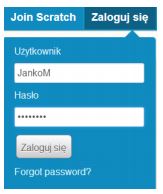
When we click Sign in on the Scratch page a sign-in window opens. Here we must enter the user name and password we provided during the sign-up process, and then click Sign in.
When we have signed in to our account in the main menu (the blue bar at the top) three new items appear:
- envelope – allowing us to move to the page Messages which contains information about comments on the user’s projects and other events associated with his/her activity on the Scratch page;
- folder with the letter S – allows us to quickly go to the My Stuff page with a list of the user’s projects;
- icon and username – contains a drop-down menu where we can select:
- Profile – access to the description of the user profile. Here we can enter user information (About me), and projects created by the user (What I’m working on).
- My Stuff – access to a page listing projects created by the user.
- Account settings – access to a page where our password and e-mail address can be changed.
- Sign out – sing out of your account.
Grouping projects (Studio)
In the My stuff window there is a list of projects created by the user.
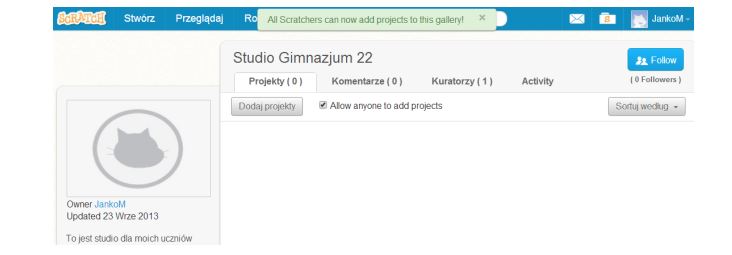
The user can click on New project to create a project. He/she can also create a new studio – a place for grouping selected projects. Studio (formerly called the gallery) is a convenient place for the teacher where he/she can collect students’ projects. For this purpose we need to create a new studio, then:
- Click on the name, change it and provide it to students.
- Check the box Allow anyone to add projects'.
- Click the Follow button to receive information about activity in the studio.
Adding projects to the studio is very simple. On the list of projects we choose the Add to button and indicate the studio to which we want to add the project.
Note:
a project added to the studio must be made available to other members of the Scratch community. For this purpose we need to click the button Share on the right side of the project. We can cancel sharing a project by selecting Unshare.
Help page, installing an off-line version
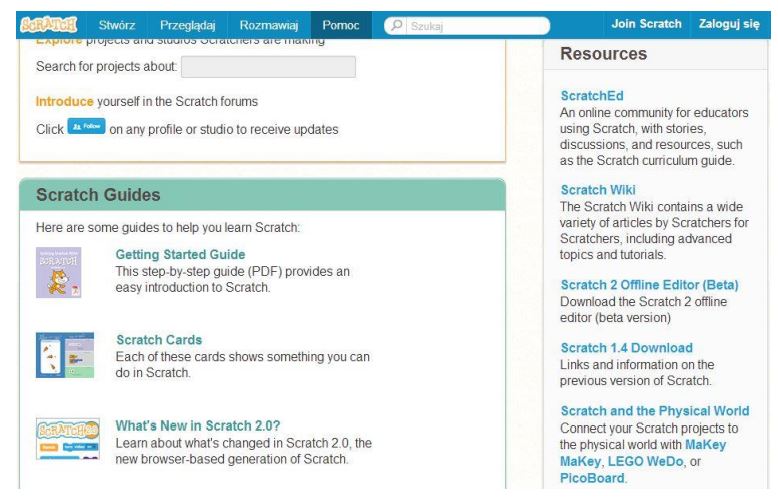
When we click the Help button in the main menu we can see a lot of materials which can help us in learning Scratch.
Some of the things we can find here:
- Getting Started Guide – a guide in English: Getting Started in PDF format containing an introduction – the basics of using Scratch.
- Scratch Cards – work cards in English, with an introduction to building simple projects.
- What's New in Scratch 2.0 – a description in English: What's new in Scratch 2.0 (compared to version 1.4).
On the right side in the Resources section there are links to additional Scratch resources (all in English):
- ScratchEd – portal for Scratch teachers.
- Scratch Wiki – a page with descriptions and guides prepared by Scratch users.
- Scratch 2 Offline Editor (Beta) – allows us to install the 2.0 version of the programme on our computer.
- Scratch 1.4 Download – allows us to install the old 1.4 version of the programme on our computer.
- Scratch and the Physical World – a link to a description of possibilities for using external devices in Scratch (e.g. for controlling structures built of Lego blocks)
- ...
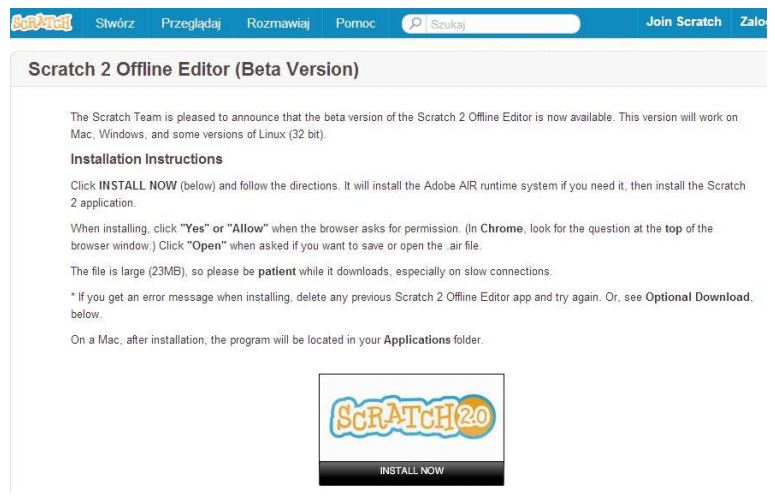
It is easy to install an off-line version, but it requires a good Internet connection.
After selecting the Scratch 2 Offline Editor (Beta) link on the Help page, we need to click the image SCRATCH2.0 INSTALL NOW.
First Adobe AIR runtime system is installed, and then the programme Scratch 2.0. The programme can run on Windows, MacOS and Linux. The desktop version of the environment installed on our computer can run without an Internet connection, it works in the same way as the on-line version.
