Module 1 - Getting started in Scratch: Różnice pomiędzy wersjami
| (Nie pokazano 5 wersji utworzonych przez jednego użytkownika) | |||
| Linia 61: | Linia 61: | ||
'''Then we ask the following question:''' Can you see a block that moves the sprite (kitten) by a number of steps? | '''Then we ask the following question:''' Can you see a block that moves the sprite (kitten) by a number of steps? | ||
''Students should be able to notice the block move by 10 steps.'' | ''Students should be able to notice the block move by 10 steps.'' | ||
| + | |||
| + | |||
| + | |||
| + | [[Plik:C1.png|center]] | ||
| + | |||
| + | |||
| + | '''We ask the students''' to move the block to the right side of the screen. | ||
| + | |||
| + | '''We ask the following question:''' Is it possible to change the number of steps by which the sprite will move? | ||
| + | ''Students should notice that they can change the number of steps by clicking on it, and then typing in a different value.'' | ||
| + | |||
| + | '''Task:''' We ask the students to set it to 20 steps. | ||
| + | |||
| + | '''We ask the following question:''' Is there something missing in our programme? Shouldn’t the block we have placed on the right be connected with others? | ||
| + | ''The students should realize that both there are elements missing at the top and bottom of the block (as in a jigsaw puzzle).'' | ||
| + | |||
| + | '''We explain''' that a programme should have a beginning and an end. It can be run by clicking the green flag in the top right corner of the screen and exited by selecting the red dot next to it. We ask them to use the flag. | ||
| + | |||
| + | '''We ask the following question:''' Did anything happen when you clicked on the flag? ''Answer: No.'' | ||
| + | |||
| + | '''We explain''' that this is because our programme has no beginning or end. We ask the students to find the block which will be the beginning. We can give them a hint: it cannot be connected to any other block from the top. | ||
| + | ''Students should find the '''when the green flag is clicked''' block.'' | ||
| + | |||
| + | |||
| + | [[Plik:C2.png|center]] | ||
| + | |||
| + | |||
| + | We ask them to connect it to the block that moves the sprite. | ||
| + | |||
| + | |||
| + | [[Plik:C3.png|center]] | ||
| + | |||
| + | |||
| + | We then ask them to find a block ending the programme; this block cannot be connected to any other block from the bottom. We suggest that sometimes it’s impossible to see all the blocks, so we have to use the option of scrolling through the list on which they can be found. | ||
| + | ''Students should find the '''stop everything block''' and notice that it can be set to '''stop this script''' or '''stop other sprite scripts'''.'' | ||
| + | |||
| + | |||
| + | [[Plik:C30.png|center]] | ||
| + | |||
| + | |||
| + | |||
| + | '''Task:''' We ask the students to add the '''stop this script''' block and then run the programme (by clicking on the green flag symbol in the top right corner). Let them repeat clicking it several times. ''The sprite moves on the screen.'' | ||
| + | |||
| + | [[Plik:move_steps.png|center]] | ||
| + | |||
| + | |||
| + | [[Plik:C31.png|center]] | ||
| + | |||
| + | |||
| + | Now we ask the students to find the block allowing them to control the sprite using the keyboard (when the <space> key is pressed). | ||
| + | |||
| + | |||
| + | [[Plik:space_pressed.png|center]] | ||
| + | |||
| + | |||
| + | '''We ask the following question:''' Can it be used? What do we need to do in order to use it? | ||
| + | ''Together we come to the conclusion that we need to replace the '''when the green flag is clicked''' block with the '''when the <space> key is pressed''' block.'' | ||
| + | |||
| + | '''Task:''' We ask the students to replace the blocks. | ||
| + | ''We set the '''when the <space> key is pressed''' block. Then we grab the '''move by 20 steps''' block with the mouse to detach it from the '''when the green flag is clicked''' block and attach it under the newly embedded block. We remove the '''when the green flag is clicked''' block (move it back to the area of blocks or “cut” with the scissors tool).'' | ||
| + | |||
| + | |||
| + | [[Plik:C6.png|center]] | ||
| + | |||
| + | |||
| + | '''Then we ask:''' In the '''when the <space> key is pressed''' block is it possible to replace the space key with another key, e.g. the right arrow? | ||
| + | ''Students check that they can select the desired key from the drop-down list in the block.'' | ||
| + | |||
| + | '''Task:''' We ask the students to select the '''right arrow''' key, and then to start the programme and teste its operation. | ||
| + | |||
| + | |||
| + | [[Plik:C7.png|center]] | ||
| + | |||
| + | |||
| + | |||
| + | '''We ask the following question:''' How does the programme work? Does the sprite move after you start the programme (i.e. click on the green flag)? And what if you press the right arrow key? | ||
| + | ''After the programme is started nothing happens, but the sprite moves each time the right arrow key is pressed. | ||
| + | '' | ||
| + | '''Task:''' we ask the students to change the number of steps by which the character moves when the key is pressed and then to re-start and test the programme. | ||
| + | |||
| + | '''We ask the following question:''' Does the character move faster or slower? ''Students should obtain different results. This will depend on the number of steps – whether it has been set to a higher or lower value.'' | ||
| + | |||
| + | '''We explain''' that the sprite may leave a trail, in other words it can draw. We want the sprite to start drawing when the space key is pressed and to stop drawing when the P key is pressed. | ||
| + | |||
| + | '''We ask the students''' to check which blocks cause the pen to be applied and which raise it. ''Students should find the following:'' | ||
| + | |||
| + | |||
| + | [[Plik:C8.png|center]] | ||
| + | |||
| + | |||
| + | '''Task:''' We ask the students to add a new script causing '''the pen to be applied''' when the '''spacebar''' is pressed and another to '''lift it up''' when the '''P key''' is pressed. '''Time to complete:''' ''We give them two to three minutes.'' | ||
| + | |||
| + | |||
| + | [[Plik:C9.png|center]] | ||
| + | |||
| + | |||
| + | '''Then we ask''' who has already completed the task. We ask a student to come to the interactive whiteboard to show other students how he/she did it. Together we d whether the task was completed well. | ||
| + | |||
| + | |||
| + | [[Plik:C10.png|center]] | ||
| + | |||
| + | |||
| + | [[Plik:C12.png|center]] | ||
| + | |||
| + | |||
| + | '''Task:''' We ask the students to add a script that uses the '''rotate by 15 degrees''' block so that the sprite rotates when the '''down arrow''' key is pressed. After completing this task, students should test the last few tasks, i.e. move the character, apply the pen, draw something, lift the pen up. | ||
| + | |||
| + | |||
| + | |||
| + | [[Plik:C13.png|center]] | ||
| + | |||
| + | |||
| + | |||
| + | [[Plik:C13.png|center]] | ||
| + | |||
| + | |||
| + | |||
| + | [[Plik:C14.png|center]] | ||
| + | |||
| + | |||
| + | Task: We ask the students to find a block which can clear the stage. | ||
| + | |||
| + | |||
| + | [[Plik:C14_001.png|center]] | ||
| + | |||
| + | |||
| + | Once the '''clear''' block is found, we ask the students to click it. We explain that this is how we can test the function of a selected block – see its function without having to insert it into the script. | ||
| + | |||
| + | Using this new block the students are to create another script for clearing the stage by pressing the '''C key'''. | ||
| + | |||
| + | |||
| + | [[Plik:C15.png|center]] | ||
| + | |||
| + | |||
| + | ''Then we ask all the students to set their character, facing right, in the top left corner of the stage. | ||
| + | Students can do this in many ways – by pressing the down arrow until the sprite is facing right and then dragging it with the mouse to the correct specific place. They can also find and use the set '''the direction to 90''' block. They do not need to insert it into the script – it’s enough just to click it. If necessary, we demonstrate how to do this. We also show them how to reduce the size of the sprite (so that the drawing it creates can be seen better).'' | ||
| + | |||
| + | |||
| + | [[Plik:C16.png|center]] | ||
| + | |||
| + | |||
| + | We ask the students to set to 100 the number of steps by which the character will move when the '''right arrow key''' is pressed. Then we tell them to try and control the sprite’s movement in a way that will allow them to draw a square. We ask an additional question: How many times (by what angle) the sprite needs to be rotated after one side of the square is drawn? | ||
| + | ''Students should note that they need to make 6 turns, i.e. rotate the sprite by a total of 90 degrees.'' | ||
| + | |||
| + | We invite a student to show the solution on the interactive whiteboard and we discuss it with the group. Then we ask the students to change the rotation value for the script (block) when the down arrow key is pressed to 90 and test the programme again. We change the value on the board. | ||
| + | ''We conclude that now the sprite needs four changes for a full rotation. This allows us to determine that the character will move only right, down, left and up, provided that the initial movement was in one of these directions (which is why we asked for this particular initial setting of the sprite).'' | ||
| + | |||
| + | '''Task:''' We ask the students to save their programme as '''First Programme'''. | ||
| + | Then we ask them to select '''New''' from the '''File''' menu to create a new programme. | ||
| + | |||
| + | |||
| + | ===Modify the costume and animate the sprite === | ||
| + | Time to complete this part: about 20 minutes | ||
| + | ''' | ||
| + | |||
| + | We ask the following question:''' Does the sprite always have to be a kitten and wouldn’t it be fun if we could change it in any way we want? We ask whether the students can see an option on the screen they think could be used to effect such a change. | ||
| + | ''Students should see that in the centre of the screen there are several tabs, among them Costumes. When we open it, we can change the sprite’s costumes.'' | ||
| + | |||
| + | '''Task:''' We ask the students to try to draw a new costume, import a ready costume from the Scratch costume gallery and remove unnecessary costumes. | ||
| + | |||
| + | |||
| + | [[Plik:C17.png|center]] | ||
| + | |||
| + | |||
| + | [[Plik:C18.png|center]] | ||
| + | |||
| + | |||
| + | '''Task:''' Then we ask the students to import a car costume and draw a blue police light beacon on it. Then ask them to copy the modified sprite and change the beacon colour to red in the other costume. | ||
| + | |||
| + | |||
| + | [[Plik:C11.png|center]] | ||
| + | |||
| + | |||
| + | [[Plik:C19.png|center]] | ||
| + | |||
| + | |||
| + | '''Task:''' We want the car roof beacon to flash when the programme is started. We ask the students to find a block which can be used to switch between costumes. | ||
| + | ''Students should find a few blocks. We tell them to click each of them several times and check what happens to the sprite on the stage.'' | ||
| + | |||
| + | |||
| + | [[Plik:C19_001.png|center]] | ||
| + | |||
| + | ''Students should see that by clicking on the '''next costume''' block they switch between a red and blue coloured beacon. We can explain that this way they can animate the picture by changing sprite costumes.'' | ||
| + | |||
| + | |||
| + | |||
| + | [[Plik:C20.png|center]] | ||
| + | |||
| + | |||
| + | |||
| + | We ask the students to drag the '''next costume''' block to the script area and start the programme using the green flag. | ||
| + | |||
| + | '''We ask the following question:''' Has anything happened? What is missing? | ||
| + | ''No. The green flag block is missing.'' | ||
| + | |||
| + | '''Task:''' We ask the students to add the green flag block and then click on it a few times and check the result. | ||
| + | ''The beacon colour changes each time only once, when the programme is started.'' | ||
| + | |||
| + | '''We ask the following question:''' What is missing that would allow the costume to alternate between the blue and red beacon after the programme is started? | ||
| + | ''Students will have various ideas, e.g. add multiple '''change costume''' blocks. If necessary, we prompt them that we want to keep the costume changing all the time when the programme is running, that is, each time we press the green flag.'' | ||
| + | |||
| + | |||
| + | We ask the students to find the appropriate block – we can hint that it is probably located in the Control group. | ||
| + | ''Students may offer various suggestions. We discuss the ideas submitted in order to finally select the '''always''' block.'' | ||
| + | |||
| + | |||
| + | |||
| + | [[Plik:C21.png|center]] | ||
| + | |||
| + | |||
| + | ''We ask them how it should be included in the script. If necessary, we suggest that whatever is always to happen should be inserted inside the block.'' | ||
| + | |||
| + | '''Task:''' We ask the students to modify and start the programme. | ||
| + | |||
| + | '''We ask the following question:''' Can we see the car roof beacon flashing? | ||
| + | ''The flashing effect is not well visible, because the costume changes very quickly.'' | ||
| + | |||
| + | |||
| + | '''We ask the following question:''' Is there a control block which can cause the costume to alternate more slowly? | ||
| + | ''If necessary, we prompt the students that between changes the sprite should wait, and so the '''wait''' block should be inserted in the right place.'' | ||
| + | |||
| + | |||
| + | |||
| + | [[Plik:C23.png|center]] | ||
| + | |||
| + | |||
| + | '''''We ask the following question:''' Now can we see the car roof beacon flashing? | ||
| + | Students will come to the conclusion that the changes can be seen, but they are too slow. We can suggest how to modify the waiting time by setting it to e.g. half a second instead of one second. Some students may not notice the change because they will have inserted the wait block outside the '''always''' loop. In such a case we need to discuss with all the students why the wait block should be inserted there – so that always after changing the costume the sprite waits for a specified time.'' | ||
| + | |||
| + | |||
| + | [[Plik:C22.png|center]] | ||
| + | |||
| + | |||
| + | |||
| + | '''Task:''' We ask the students to save the programme as Second Programme. | ||
| + | |||
| + | |||
| + | |||
| + | ===Drawing a square === | ||
| + | Time to complete this part: about 25 minutes | ||
| + | |||
| + | |||
| + | We remind the students that the computer runs according to a specific set of rules provided by man. | ||
| + | |||
| + | We ask the following question: Can anyone name a rule they have come across while playing or at a lesson or at school (e.g. maths)? | ||
| + | ''We suggest for example the instructions for using Lego blocks or building a model airplane, describing step by step which blocks (components) and in what order should be used (glued) to build a specific model. We can ask the students whether they have already learned to add integers in writing. We ask a volunteer to write on the board the rules for adding two three-digit numbers. Example: | ||
| + | |||
| + | 1. ''write the first number on a sheet of paper;'' | ||
| + | |||
| + | 2. ''write the second number under the first, aligning it to the right, so that the single digit is under the single digit of the first number, proceed similarly with the tens and hundreds digits;'' | ||
| + | |||
| + | 3. ''draw a line under the second number;'' | ||
| + | |||
| + | 4. ''add the single digits, write the last digit of the result under the line in the single digit column; if the result is double-digit, write the one (carried forward) in the tens column above the first number;'' | ||
| + | |||
| + | 5. ''add the digits in the second column (tens) in the same way as in the case of single digits; write any digit carried forward in the hundreds column;'' | ||
| + | |||
| + | 6. ''add the hundreds digits; write any digit carried forward before the hundreds digit of the result. Note that a strict rule for adding two three-digit integers has just been written down. We can say that such a rule is called an algorithm.'' | ||
| + | |||
| + | |||
| + | We suggest to consider together a rule (algorithm) for drawing a square by the sprite. | ||
| + | '''We ask the following question:''' What subsequent steps need to be taken so that a square is drawn? In other words, what is the rule (algorithm) for drawing a square? We write it on the board, for example: | ||
| + | |||
| + | ''Correct answer we aim at by guiding the students:'' | ||
| + | * ''apply the pen (if it is raised – to make sure that it is applied)'' | ||
| + | * ''move by 100 steps'' | ||
| + | * ''rotate the sprite by 90 degrees'' | ||
| + | * ''move by 100 steps'' | ||
| + | * ''rotate the sprite by 90 degrees'' | ||
| + | * ''move by 100 steps'' | ||
| + | * ''rotate the sprite by 90 degrees'' | ||
| + | * ''move by 100 steps'' | ||
| + | * ''rotate the sprite by 90 degrees'' | ||
| + | |||
| + | |||
| + | [[Plik:C25.png|center]] | ||
| + | |||
| + | |||
| + | |||
| + | '''We ask the following question:''' Which commands are repeated? | ||
| + | * move by 100 steps | ||
| + | * rotate the sprite by 90 degrees | ||
| + | I.e. drawing a single side of a square. | ||
| + | |||
| + | '''We ask the following question:''' How many times are these steps repeated? | ||
| + | * four | ||
| + | * A square has four sides. | ||
| + | |||
| + | '''Task:''' We ask the students to find a block which can be used to repeat an operation for a specified number of times. | ||
| + | ''Students should find the '''repeat <10> times''' block.'' | ||
| + | |||
| + | |||
| + | [[Plik:C26.png|center]] | ||
| + | |||
| + | |||
| + | '''Task:''' We ask students to try to create a script which draws a square when the K key is pressed (the students can write subsequent steps on the board): | ||
| + | * ''apply the pen'' | ||
| + | * ''repeat two operations four times'' | ||
| + | * ''move by 100 steps'' | ||
| + | * ''rotate the character by 90 degrees'' | ||
| + | * ''raise the pen (or – we discuss this with students, if needed, and determine what state we want to achieve)'' | ||
| + | * ''finish the task'' | ||
| + | |||
| + | |||
| + | We give students a few minutes to build the script. We walk around the room and, if necessary, provide suggestions on how to solve the problem. After they finish we ask them to save the programme as '''Square''' using the '''File -> Save As'''.... menu path. | ||
| + | |||
| + | |||
| + | |||
| + | [[Plik:C27.png|center]] | ||
| + | |||
| + | |||
| + | ===Additional tasks === | ||
| + | '''Additional task for self-completion:''' We suggest that the students change the colour of the pen and its thickness, and re-test the programme. We do not suggest which blocks they should use and where. Finally, we check the solutions and present selected ones on the board. After the students finish the exercise we ask them to save their programme as '''Square2''' using the '''File -> Save As'''.... menu path. | ||
| + | |||
| + | |||
| + | [[Plik:C29.png|center]] | ||
| + | |||
| + | |||
| + | '''Additional task for self-completion:''' We ask the students to return to the programme saves as '''First Programme''' and modify it. Instead of rotating the kitten using the '''down arrow''' key, we define scripts running when the following keys are pressed: | ||
| + | * '''up arrow''' to set the sprite upwards and move 20 steps | ||
| + | * '''down arrow''' to set the sprite downwards and move 20 steps | ||
| + | * '''right arrow''' to set the sprite to the right and move 20 steps | ||
| + | * '''left arrow''' to set the sprite to the left and move 20 steps | ||
| + | |||
| + | They students should save the modified programme as '''Third Programme'''. | ||
Aktualna wersja na dzień 20:31, 7 lip 2015
These materials have been developed by Ośrodek Edukacji Informatycznej i Zastosowań Komputerów (Centre for Information Technology Education and Application of Computers) in Warsaw as part of the “Mistrzowie Kodowania” (“Coding Masters”) Programme funded by Samsung Electronics Polska, licensed under CC-BY-SA “Attribution – Share Alike 3.0 Poland”
Spis treści
Information
Objectives
General Objectives:
- Introduction of the concepts of algorithm (set of operations to be performed) and programme (computer readable data) with real-life examples students will be familiar with.
- Presentation of the Scratch environment.
Specific objectives
- The student will learn to move and rotate the sprite on the stage.
- The student will learn to construct simple scripts that respond to pressing a key.
- The student will understand and know how to use loop instructions for repetitive tasks.
- The student will be able to translate a simple algorithm (rule) into a programme in Scratch.
Stages
Theoretical introduction, or what we are going to do in class
Time to complete this part: about 10 minutes
We will refer to games students know. Let them list the games they play. We focus on games in which they control a character, e.g. Angry Birds.
We ask the following question: What is the purpose of the game they provided as an example? What defines success in it, i.e. what does a player need to do to win?
We select a game we also know where a character scores points or is expected to achieve a goal (complete a task), or fails (something goes wrong). Let the students describe and explain this in their own words. Example: if in Angry Birds a bird hits the cage, it causes the cage to open and sets caged birds free. If the bird hits the ground, it dies without freeing its fellow birds.
We ask the following question: How does the computer know what will happen if our character makes a given move?
We listen to the students’ responses, and recap that the computer knows the rule. Such a rule must be very detailed, because the computer cannot guess what it needs to do.
To encourage the students, we tell them that in this class we will be creating games and other programmes. We will be doing it step by step. But first we have to get ready.
Getting to know the Scratch work environment and basic commands (blocks)
Time to complete this part: about 35 minutes
Task: Students start the Scratch environment. We discuss the items shown on the screen.
We explain that the left side of the screen is a stage with a character – a kitten (in Scratch referred to as the sprite) executing the commands. In the middle of the screen there are blocks which can be used to build a programme, i.e. control the sprite. At the top we can switch between different types of blocks. On the right side there is an area of scripts where the built commands are placed.
Task: We ask the students to click on each block type and see the available blocks. We give them three to four minutes to complete this task.
Then we ask the following question: Can you see a block that moves the sprite (kitten) by a number of steps? Students should be able to notice the block move by 10 steps.
We ask the students to move the block to the right side of the screen.
We ask the following question: Is it possible to change the number of steps by which the sprite will move? Students should notice that they can change the number of steps by clicking on it, and then typing in a different value.
Task: We ask the students to set it to 20 steps.
We ask the following question: Is there something missing in our programme? Shouldn’t the block we have placed on the right be connected with others? The students should realize that both there are elements missing at the top and bottom of the block (as in a jigsaw puzzle).
We explain that a programme should have a beginning and an end. It can be run by clicking the green flag in the top right corner of the screen and exited by selecting the red dot next to it. We ask them to use the flag.
We ask the following question: Did anything happen when you clicked on the flag? Answer: No.
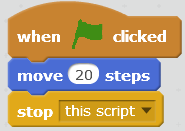
We explain that this is because our programme has no beginning or end. We ask the students to find the block which will be the beginning. We can give them a hint: it cannot be connected to any other block from the top. Students should find the when the green flag is clicked block.
We ask them to connect it to the block that moves the sprite.
We then ask them to find a block ending the programme; this block cannot be connected to any other block from the bottom. We suggest that sometimes it’s impossible to see all the blocks, so we have to use the option of scrolling through the list on which they can be found.
Students should find the stop everything block and notice that it can be set to stop this script or stop other sprite scripts.
Task: We ask the students to add the stop this script block and then run the programme (by clicking on the green flag symbol in the top right corner). Let them repeat clicking it several times. The sprite moves on the screen.
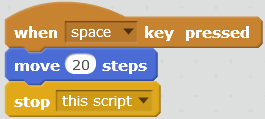
Now we ask the students to find the block allowing them to control the sprite using the keyboard (when the <space> key is pressed).
We ask the following question: Can it be used? What do we need to do in order to use it?
Together we come to the conclusion that we need to replace the when the green flag is clicked block with the when the <space> key is pressed block.
Task: We ask the students to replace the blocks. We set the when the <space> key is pressed block. Then we grab the move by 20 steps block with the mouse to detach it from the when the green flag is clicked block and attach it under the newly embedded block. We remove the when the green flag is clicked block (move it back to the area of blocks or “cut” with the scissors tool).
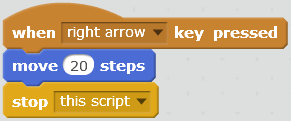
Then we ask: In the when the <space> key is pressed block is it possible to replace the space key with another key, e.g. the right arrow?
Students check that they can select the desired key from the drop-down list in the block.
Task: We ask the students to select the right arrow key, and then to start the programme and teste its operation.
We ask the following question: How does the programme work? Does the sprite move after you start the programme (i.e. click on the green flag)? And what if you press the right arrow key? After the programme is started nothing happens, but the sprite moves each time the right arrow key is pressed. Task: we ask the students to change the number of steps by which the character moves when the key is pressed and then to re-start and test the programme.
We ask the following question: Does the character move faster or slower? Students should obtain different results. This will depend on the number of steps – whether it has been set to a higher or lower value.
We explain that the sprite may leave a trail, in other words it can draw. We want the sprite to start drawing when the space key is pressed and to stop drawing when the P key is pressed.
We ask the students to check which blocks cause the pen to be applied and which raise it. Students should find the following:
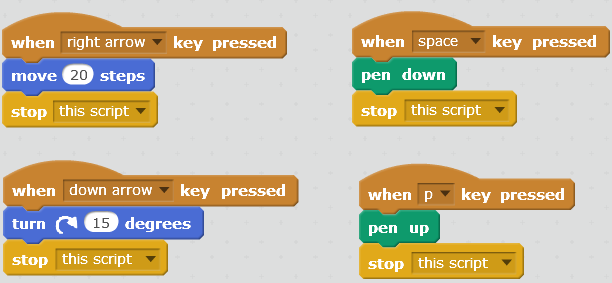
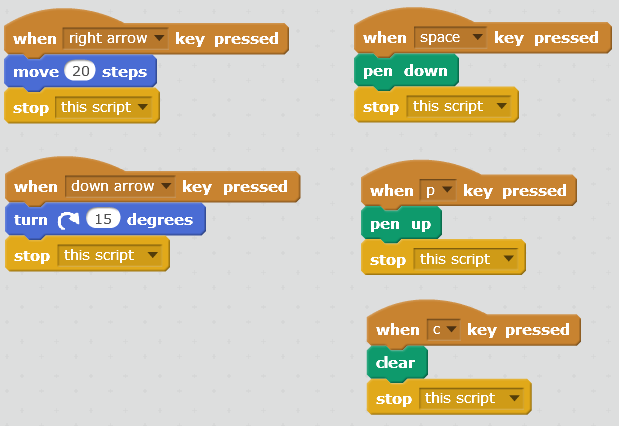
Task: We ask the students to add a new script causing the pen to be applied when the spacebar is pressed and another to lift it up when the P key is pressed. Time to complete: We give them two to three minutes.
Then we ask who has already completed the task. We ask a student to come to the interactive whiteboard to show other students how he/she did it. Together we d whether the task was completed well.
Task: We ask the students to add a script that uses the rotate by 15 degrees block so that the sprite rotates when the down arrow key is pressed. After completing this task, students should test the last few tasks, i.e. move the character, apply the pen, draw something, lift the pen up.
Task: We ask the students to find a block which can clear the stage.
Once the clear block is found, we ask the students to click it. We explain that this is how we can test the function of a selected block – see its function without having to insert it into the script.
Using this new block the students are to create another script for clearing the stage by pressing the C key.
Then we ask all the students to set their character, facing right, in the top left corner of the stage.
Students can do this in many ways – by pressing the down arrow until the sprite is facing right and then dragging it with the mouse to the correct specific place. They can also find and use the set the direction to 90 block. They do not need to insert it into the script – it’s enough just to click it. If necessary, we demonstrate how to do this. We also show them how to reduce the size of the sprite (so that the drawing it creates can be seen better).
We ask the students to set to 100 the number of steps by which the character will move when the right arrow key is pressed. Then we tell them to try and control the sprite’s movement in a way that will allow them to draw a square. We ask an additional question: How many times (by what angle) the sprite needs to be rotated after one side of the square is drawn?
Students should note that they need to make 6 turns, i.e. rotate the sprite by a total of 90 degrees.
We invite a student to show the solution on the interactive whiteboard and we discuss it with the group. Then we ask the students to change the rotation value for the script (block) when the down arrow key is pressed to 90 and test the programme again. We change the value on the board. We conclude that now the sprite needs four changes for a full rotation. This allows us to determine that the character will move only right, down, left and up, provided that the initial movement was in one of these directions (which is why we asked for this particular initial setting of the sprite).
Task: We ask the students to save their programme as First Programme. Then we ask them to select New from the File menu to create a new programme.
Modify the costume and animate the sprite
Time to complete this part: about 20 minutes
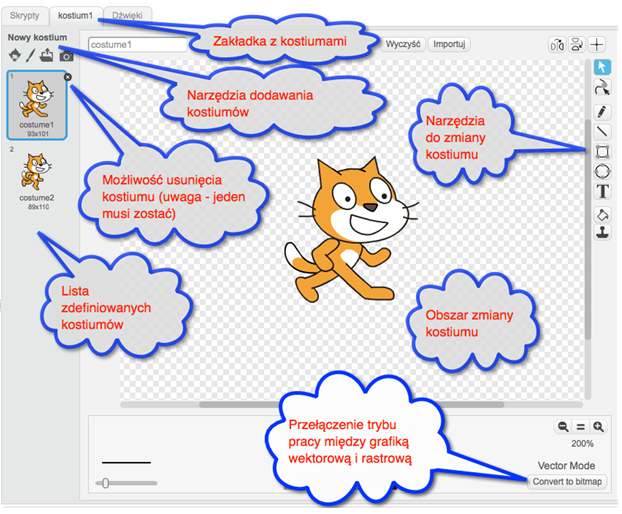
We ask the following question: Does the sprite always have to be a kitten and wouldn’t it be fun if we could change it in any way we want? We ask whether the students can see an option on the screen they think could be used to effect such a change. Students should see that in the centre of the screen there are several tabs, among them Costumes. When we open it, we can change the sprite’s costumes.
Task: We ask the students to try to draw a new costume, import a ready costume from the Scratch costume gallery and remove unnecessary costumes.
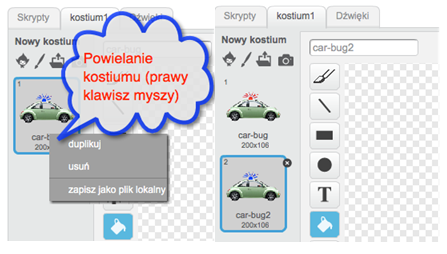
Task: Then we ask the students to import a car costume and draw a blue police light beacon on it. Then ask them to copy the modified sprite and change the beacon colour to red in the other costume.
Task: We want the car roof beacon to flash when the programme is started. We ask the students to find a block which can be used to switch between costumes.
Students should find a few blocks. We tell them to click each of them several times and check what happens to the sprite on the stage.
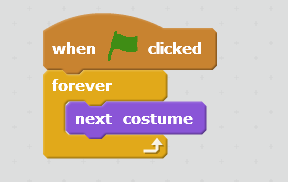
Students should see that by clicking on the next costume block they switch between a red and blue coloured beacon. We can explain that this way they can animate the picture by changing sprite costumes.
We ask the students to drag the next costume block to the script area and start the programme using the green flag.
We ask the following question: Has anything happened? What is missing? No. The green flag block is missing.
Task: We ask the students to add the green flag block and then click on it a few times and check the result. The beacon colour changes each time only once, when the programme is started.
We ask the following question: What is missing that would allow the costume to alternate between the blue and red beacon after the programme is started? Students will have various ideas, e.g. add multiple change costume blocks. If necessary, we prompt them that we want to keep the costume changing all the time when the programme is running, that is, each time we press the green flag.
We ask the students to find the appropriate block – we can hint that it is probably located in the Control group.
Students may offer various suggestions. We discuss the ideas submitted in order to finally select the always block.
We ask them how it should be included in the script. If necessary, we suggest that whatever is always to happen should be inserted inside the block.
Task: We ask the students to modify and start the programme.
We ask the following question: Can we see the car roof beacon flashing? The flashing effect is not well visible, because the costume changes very quickly.
We ask the following question: Is there a control block which can cause the costume to alternate more slowly?
If necessary, we prompt the students that between changes the sprite should wait, and so the wait block should be inserted in the right place.
We ask the following question: Now can we see the car roof beacon flashing?
Students will come to the conclusion that the changes can be seen, but they are too slow. We can suggest how to modify the waiting time by setting it to e.g. half a second instead of one second. Some students may not notice the change because they will have inserted the wait block outside the always loop. In such a case we need to discuss with all the students why the wait block should be inserted there – so that always after changing the costume the sprite waits for a specified time.
Task: We ask the students to save the programme as Second Programme.
Drawing a square
Time to complete this part: about 25 minutes
We remind the students that the computer runs according to a specific set of rules provided by man.
We ask the following question: Can anyone name a rule they have come across while playing or at a lesson or at school (e.g. maths)? We suggest for example the instructions for using Lego blocks or building a model airplane, describing step by step which blocks (components) and in what order should be used (glued) to build a specific model. We can ask the students whether they have already learned to add integers in writing. We ask a volunteer to write on the board the rules for adding two three-digit numbers. Example:
1. write the first number on a sheet of paper;
2. write the second number under the first, aligning it to the right, so that the single digit is under the single digit of the first number, proceed similarly with the tens and hundreds digits;
3. draw a line under the second number;
4. add the single digits, write the last digit of the result under the line in the single digit column; if the result is double-digit, write the one (carried forward) in the tens column above the first number;
5. add the digits in the second column (tens) in the same way as in the case of single digits; write any digit carried forward in the hundreds column;
6. add the hundreds digits; write any digit carried forward before the hundreds digit of the result. Note that a strict rule for adding two three-digit integers has just been written down. We can say that such a rule is called an algorithm.
We suggest to consider together a rule (algorithm) for drawing a square by the sprite.
We ask the following question: What subsequent steps need to be taken so that a square is drawn? In other words, what is the rule (algorithm) for drawing a square? We write it on the board, for example:
Correct answer we aim at by guiding the students:
- apply the pen (if it is raised – to make sure that it is applied)
- move by 100 steps
- rotate the sprite by 90 degrees
- move by 100 steps
- rotate the sprite by 90 degrees
- move by 100 steps
- rotate the sprite by 90 degrees
- move by 100 steps
- rotate the sprite by 90 degrees
We ask the following question: Which commands are repeated?
- move by 100 steps
- rotate the sprite by 90 degrees
I.e. drawing a single side of a square.
We ask the following question: How many times are these steps repeated?
- four
- A square has four sides.
Task: We ask the students to find a block which can be used to repeat an operation for a specified number of times. Students should find the repeat <10> times block.
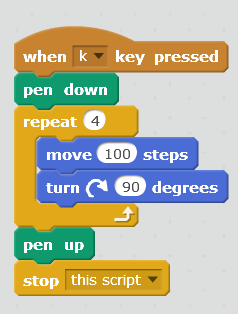
Task: We ask students to try to create a script which draws a square when the K key is pressed (the students can write subsequent steps on the board):
- apply the pen
- repeat two operations four times
- move by 100 steps
- rotate the character by 90 degrees
- raise the pen (or – we discuss this with students, if needed, and determine what state we want to achieve)
- finish the task
We give students a few minutes to build the script. We walk around the room and, if necessary, provide suggestions on how to solve the problem. After they finish we ask them to save the programme as Square using the File -> Save As.... menu path.
Additional tasks
Additional task for self-completion: We suggest that the students change the colour of the pen and its thickness, and re-test the programme. We do not suggest which blocks they should use and where. Finally, we check the solutions and present selected ones on the board. After the students finish the exercise we ask them to save their programme as Square2 using the File -> Save As.... menu path.
Additional task for self-completion: We ask the students to return to the programme saves as First Programme and modify it. Instead of rotating the kitten using the down arrow key, we define scripts running when the following keys are pressed:
- up arrow to set the sprite upwards and move 20 steps
- down arrow to set the sprite downwards and move 20 steps
- right arrow to set the sprite to the right and move 20 steps
- left arrow to set the sprite to the left and move 20 steps
They students should save the modified programme as Third Programme.


