Introduction 3 - Glossary of basic Scratch 2.0 blocks
Scenarios dedicated to primary school learners, 4th - 6th grade (basic level) These materials have been developed by Ośrodek Edukacji Informatycznej i Zastosowań Komputerów (Centre for Information Technology Education and Application of Computers) in Warsaw as part of the “Mistrzowie Kodowania” (“Masters of Coding”). Programme funded by Samsung Electronics Polska, licensed under CC BY-SA “Attribution – Share Alike 3.0”.
Spis treści
Glossary of basic Scratch 2.0 blocks
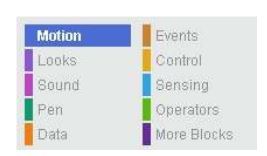
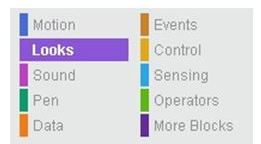
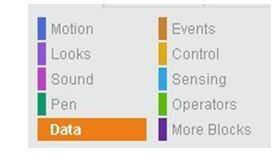
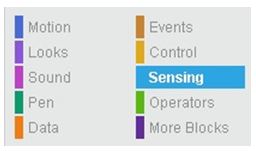
Scratch is a scripting, visual programming language. We use it to build scripts by putting together blocks representing commands, control instructions, expressions, etc. The version 2.0 set of blocks is divided into 10 categories (there were 8 categories in version 1.4), blocks in each category are distinguished by a different colour. This glossary is not a description of all the blocks, only the most important ones as well as those used in scenarios of classes designed for students in grades four to six of primary schools developed as part of the “Masters of Coding” project. Version 2.0 introduces a very important More blocks category which allows users to define their own blocks. It is not described in this document, because the first eight scenarios do not expect users to create their own blocks. This category will be described in future scenarios. Each sprite and stage may have their own scripts. The set of blocks from which you can build scripts for a stage is slightly different than that used for sprites, for example the category Motion for the stage is empty, because the stage cannot be moved or rotated. First, we will discuss various types of blocks for sprites, and then basic information about blocks available for the stage will be provided.
Motion
The category Motion groups sprite movement blocks, used for their movement, rotation and reading current data related to a sprite’s location. These are very often used basic blocks. Below is a description of all the blocks in this category.
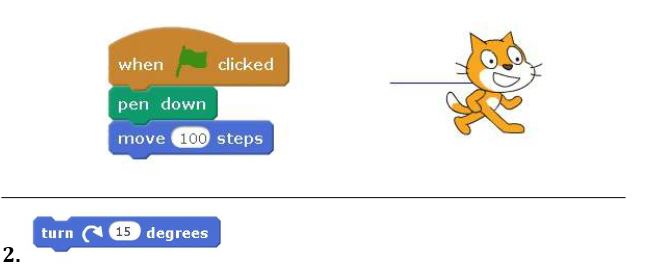
Moves the sprite by a certain distance in accordance with the current direction and current pen settings (applied/raised, colour, thickness). The default value can be edited. If we want to move the sprite back, we must enter a negative value.
Example:
Rotates the sprite right (clockwise) by a specified degree. The default value can be edited.
Example:
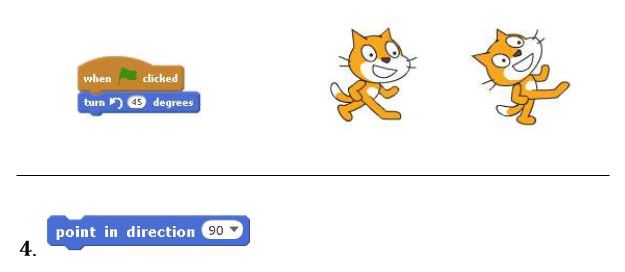
Rotates the sprite left (counterclockwise) by a specified degree. The default value can be edited. This is equivalent to a right (clockwise) rotation with a negative value.
Example:
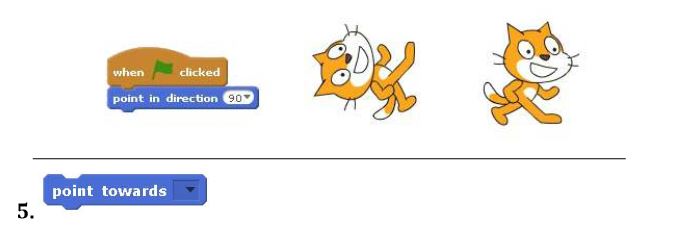
Sets the sprite in a particular direction. We can choose one of four directions from the list (90 degrees – right, -90 degrees – left, 0 degrees – up, 180 degrees – down) or enter manually a specific angle in degrees.
Example:
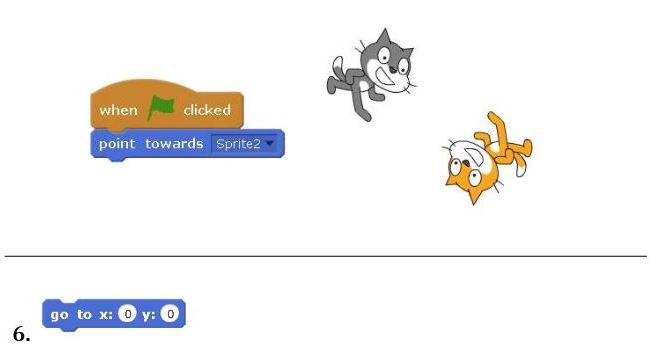
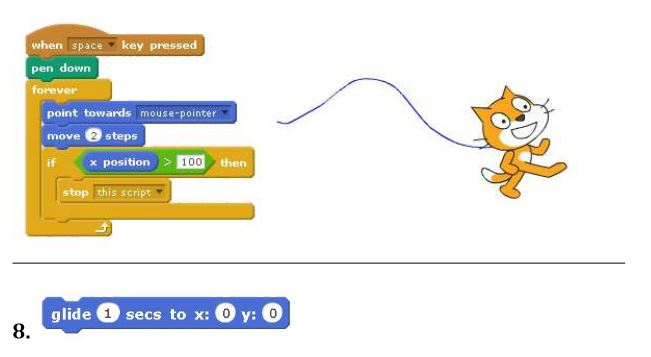
Sets the sprite in the direction of the mouse cursor or another sprite. The object (a specific sprite or mouse cursor) must be selected from the drop-down list.
Example:
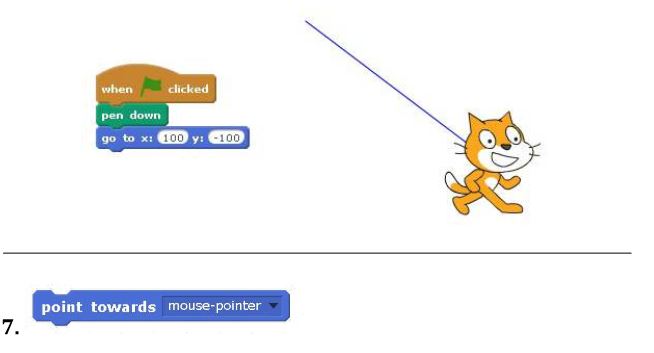
Moves the sprite to a point with specific coordinates (x, y) in accordance with the current direction and current pen settings (applied/raised, colour, thickness).
Example:
Moves the sprite to a mouse cursor position or another sprite in accordance with the current direction and current pen settings (applied/raised, colour, thickness). The object (a specific sprite or mouse cursor) must be selected from the drop-down list.
Example:
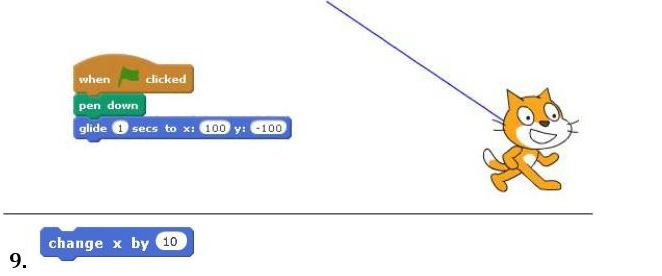
Similar to the go to x y command, but executed for a specified period of time.
Example:
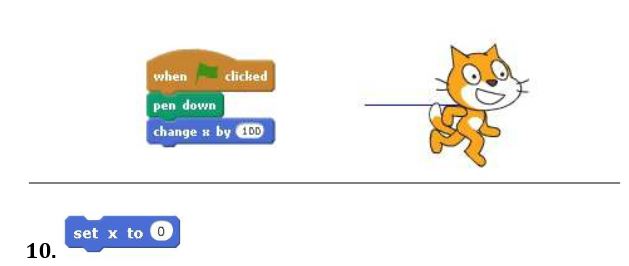
Changes the sprite’s x coordinate by a specific value in accordance with the current direction and current pen settings (applied/raised,colour, thickness). The default value can be edited.
Example:
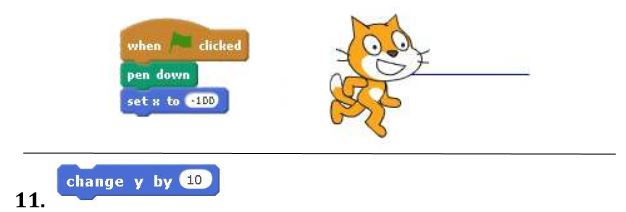
Moves the sprite to a point with a specific x coordinate value (the value of the y coordinate remains unchanged) in accordance with the current direction and current pen settings (applied/raised, colour, thickness). The default value can be edited.
Example:
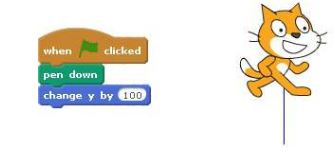
Changes the sprite’s y coordinate by a specific value in accordance with the current direction and current pen settings (applied/raised,colour, thickness). The default value can be edited.
Example:
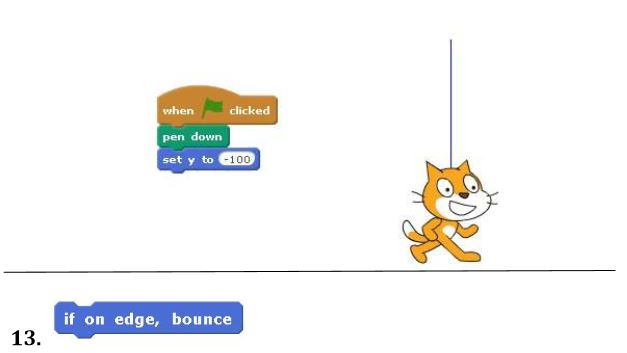
Moves the sprite to a point with a specific y coordinate value (the value of the x coordinate remains unchanged) in accordance with the current direction and current pen settings (applied/raised, colour, thickness). The default value can be edited.
Example:
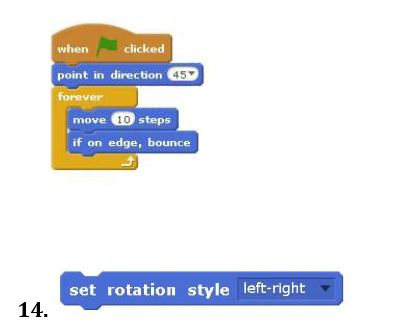
Changes the direction to the opposite when the sprite touches the edge of the stage.
Example:
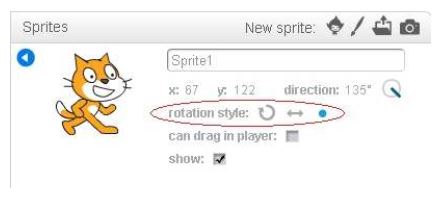
Specifies the sprite’s behaviour depending on the direction. There are three options in the drop-down list we can choose from:
- all around – the sprite looks in accordance with its direction,
- left – right – the sprite looks only to the left or right,
- don’t rotate – the sprite does not react to a change of direction.
Regardless of the manner of indicating the direction, the sprite moves in accordance with its direction. The method of indicating the direction can also be specified by editing.
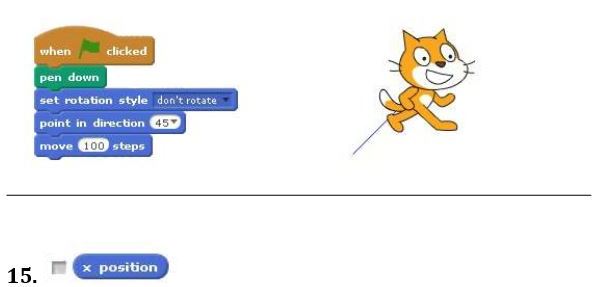
Example:
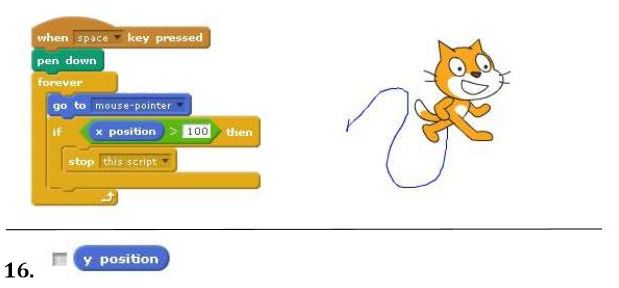
The current value of the sprite’s x coordinate – its centre. The centre can be set by editing the sprite’s costume. The returned value can be used as an argument in expressions. Checking the checkbox on the left displays the current coordinates on the stage. It adopts the values between -240 and 240.
Example:
The current value of the sprite’s y coordinate – its centre. The centre can be set by editing the sprite’s costume. The returned value can be used as an argument in expressions. Checking the checkbox on the left displays the current coordinate on the stage. It adopts the values between -180 and 180.
Example:
The current value of the sprite’s direction. It canbe used as an argument in expressions. Checking the checkbox on the left displays the current direction on the stage. It adopts the values between -180 and 180 degrees.
Example:
Looks
The Looks category is a collection of sprite appearance blocks concerning costume, size, visibility, etc. Some of these blocks are used very often. Below is a description of most blocks in this category.
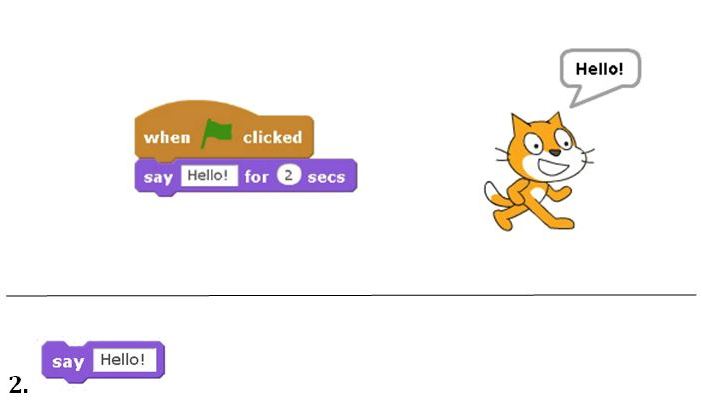
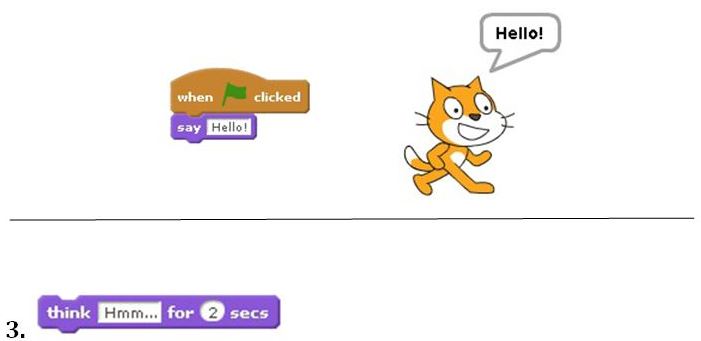
For a limited time displays in a speech bubble the text shown in the edit box. This means stopping the script execution for a specified number of seconds. A variable can also be dragged into the edit box or an expression can be built in it – often to connect the displayed information we use the join block.
Example:
Displays in a speech bubble the text shown in the edit box and does not stop the script execution. Consequently, further instructions are executed, which might cause the bubble’s quick disappearance. A variable can also dragged into the edit box or an expression can be built in it – often to connect the displayed information we use the join block.
Example:
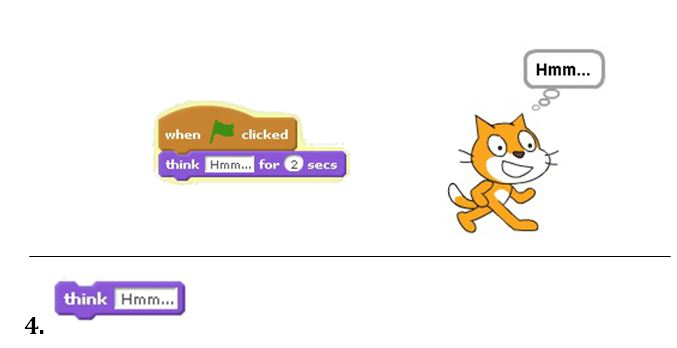
For a limited time displays in a thought bubble the text shown in the edit box. This means stopping the script execution for a specified number of seconds. It works in the same way as the say command, but a different kind of information is displayed. A variable can also be dragged into the edit box or an expression can be built in it – often to connect the displayed information we use the join block.
Example:
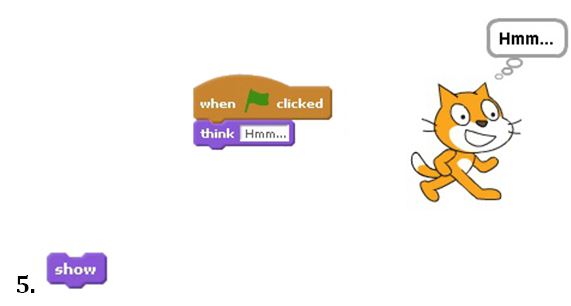
Displays in a thought bubble the text shown in the edit box and does not stop the script execution. Consequently, further instructions are executed, which might cause the information’s quick disappearance. It works in the same way as the say command, it is just a different kind of bubble. A variable can also be dragged into the edit box or an expression can be built in it – often to connect the displayed information we use the join block.
Example:
Displays a sprite image (the current costume) if the sprite is hidden. If the sprite is visible, it has no effect.
Hides a sprite image if the sprite is visible. If the sprite is invisible, it has no effect.
Makes the sprite change its costume to a specific one, selected from the drop-down list. By default the sprite (kitten) has two costumes.
Example:
Makes the sprite change its costume to a subsequent one. The next costume after the last one is again the first one on the list. This block is often used for sprite animation.
Example:
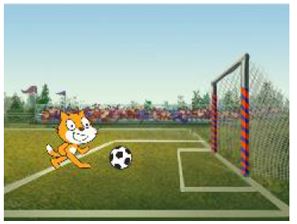
The stage may consist of multiple stages (by default there is only one, white background). With this block the sprite can change the background to one selected from the drop-down list (with a specific name, the next background, the previous background). Note: this block is unavailable for sprite scripts in version 1.4 (available only for stage scripts).
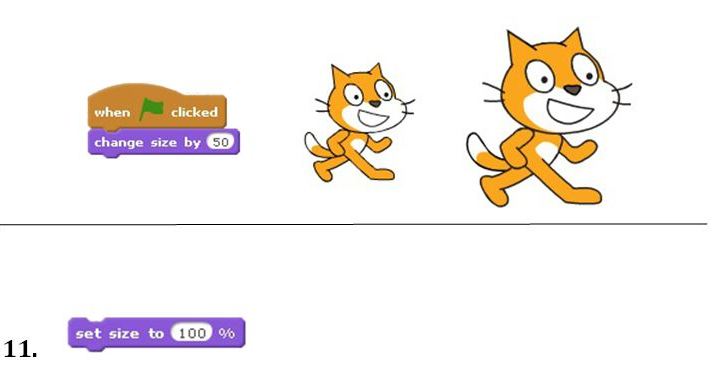
Used to change the sprite’s size (all costumes) by a specified value. If we want to reduce the sprite’s size, we must enter a negative argument.
Example:
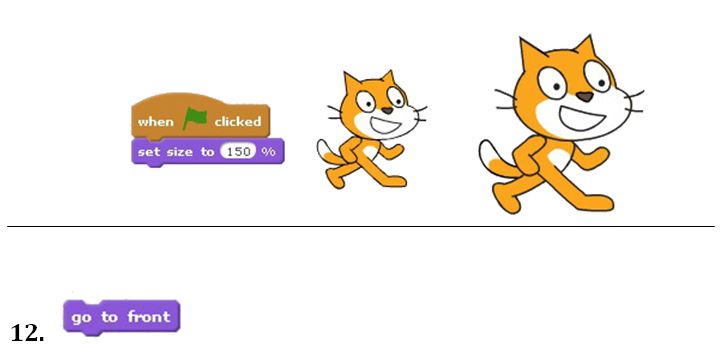
Used to change the sprite’s size (all costumes) to a specified percent value. If we want to restore it to the original size, the size should be set to 100%.
Example:
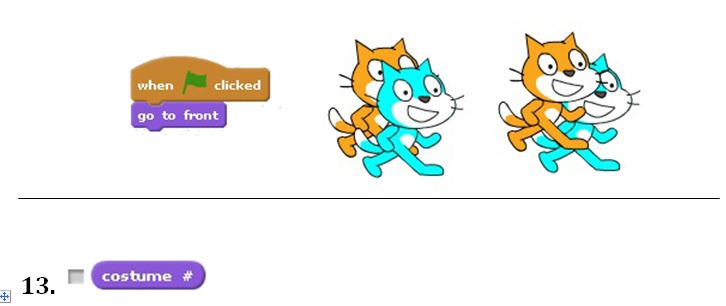
If the sprite is covered by other sprites, it will be displayed on top.
Example:
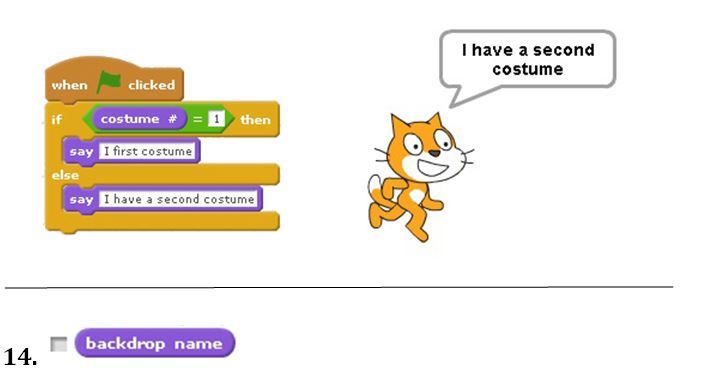
The current sprite costume number. It can be used as an argument in expressions. Checking the checkbox on the left displays the current number on the stage.
Example:
Name of the currently displayed background. It can be used as an argument in expressions. Checking the checkbox on the left displays the background name on the stage.
Example:
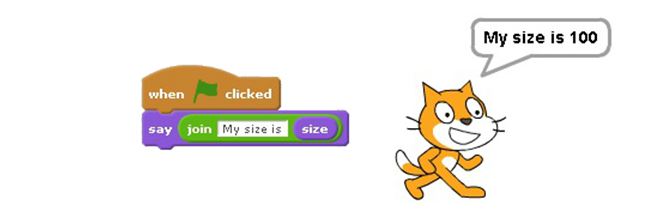
Current sprite size expressed as a percent value. It can be used as an argument in expressions. Checking the checkbox on the left displays the size on the stage.
Example:
Sounds
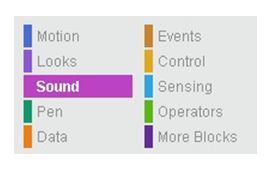
The Sound category is a group of blocks for sounds, instruments and musical notes. Below is a description of audio file playback blocks only. A sprite may be connected with various sounds (assigned audio files), by default the cat sprite is assigned one sound – meow. To change sounds assigned to a given sprite (removing/adding a sound file, recording our own audio) we use the Sounds tab.
Plays the audio file selected from the drop-down list. The subsequent script instructions are executed independently of the audio being played.
Example:
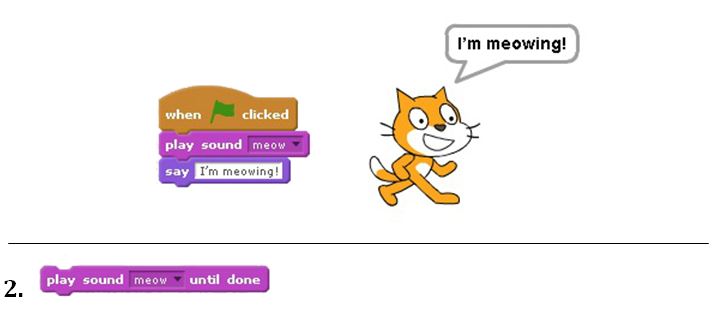
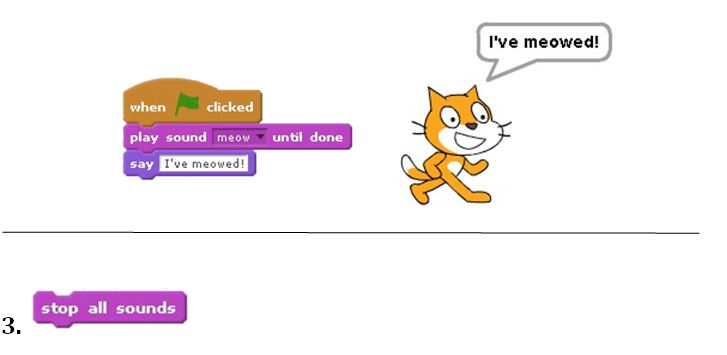
Causes the audio file selected from the drop-down list to be played and pauses the script execution. Subsequent script instructions are executed after the audio file playback has finished.
Example:
Stops all currently played sounds.
Pen
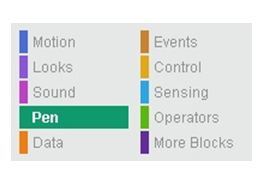
The Pen category is a collection of blocks connected with a sprite’s pen, its status, colour and thickness. This group also includes a block used to clear created drawings and the possibility of copying the sprite’s image as a stamp. Below is a description of all the blocks in this category.
Clears the drawings created by all sprites. It has no effect on the stage background.
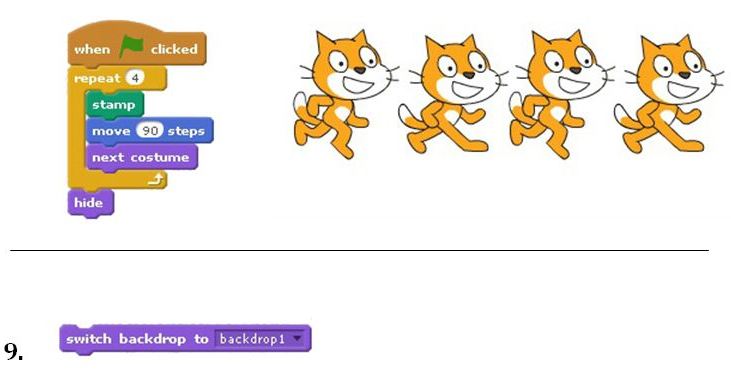
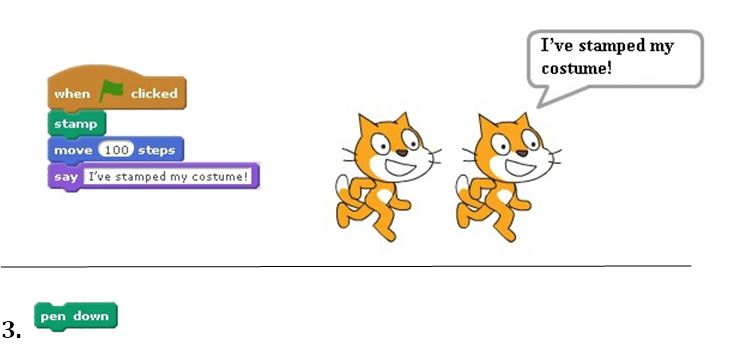
Causes the sprite image (the current costume) to be stamped as a stamp image.
Example:
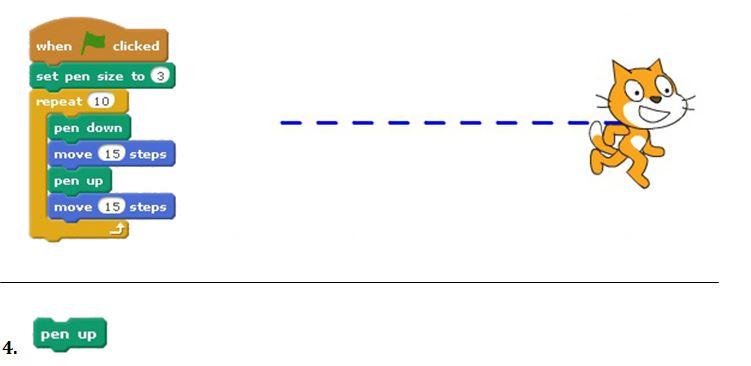
Causes the pen to be applied. The movements performed will cause a drawing to be created in accordance with the pen settings (colour, thickness).
Example:
Causes the pen to be raised. Sprite movements will not result in the creation of a drawing. Example: See the description of the apply pen block.
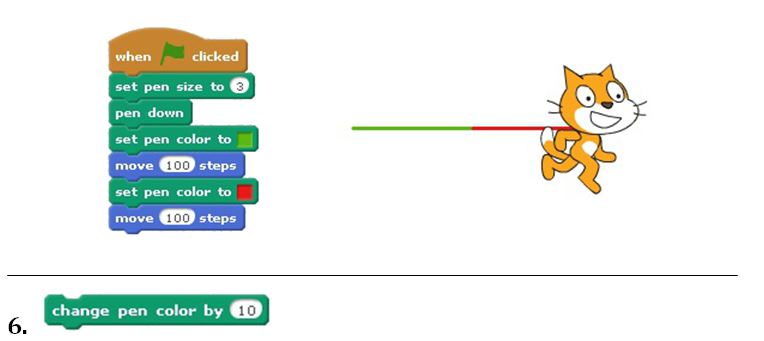
Selects the pen colour. We should click the mouse on the box with the colour, then select a colour from the ones available using the mouse cursor. In the following example green was selected by clicking the green flag and red in the script execution stop button. Depending on the selected colour also the colour shade settings change.
Note: In version 1.4 after clicking on the colour block square the palette of colours to choose a from is also displayed. Unfortunately, now there is no such option in version 2.0.
Example:
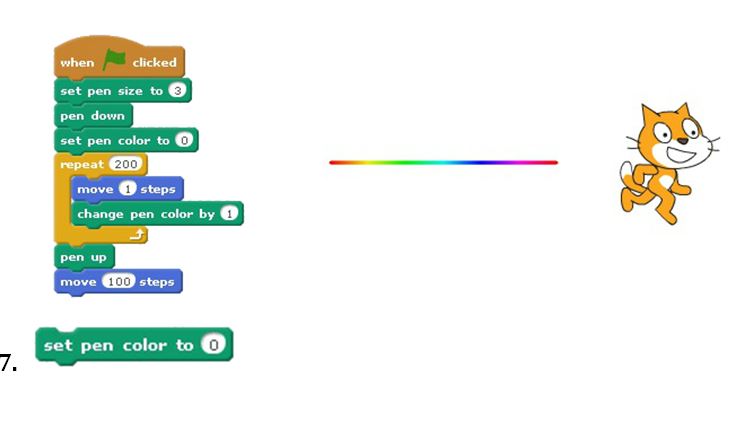
Each colour has its numerical value. Colour numbers vary in the range of 0 to 200 by passing through the colours of the rainbow. The colour number 0 is red, 70 is green, 130 blue, and 170 crimson (magenta). This command changes the colour value by a specified argument.
Example:
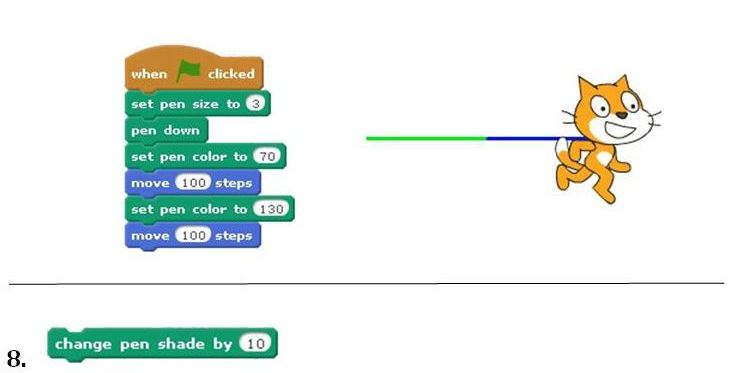
Each colour has its numerical value. Colour numbers vary in the range of 0 to 200 by passing through the colours of the rainbow. The colour number 0 is red, 70 is green, 130 blue, and 170 crimson (magenta). This command sets the colour in accordance with a specified numerical value.
Example:
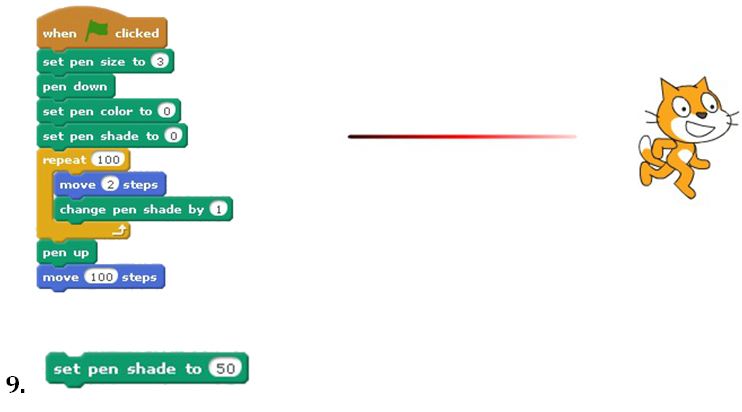
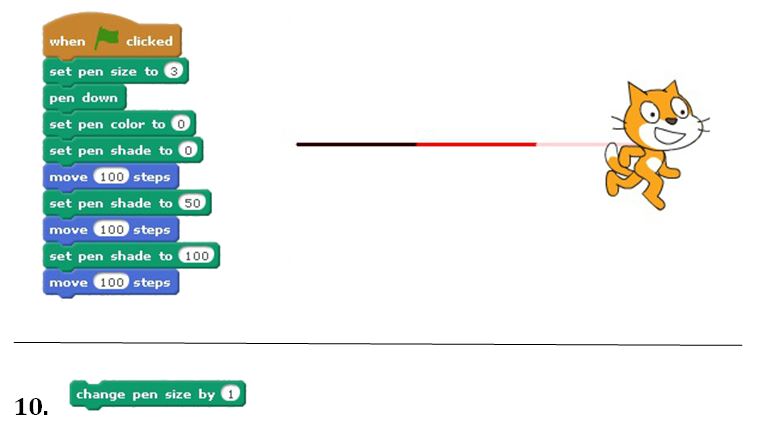
Each colour has a shade determined by a numerical value between 0 and 100. The shade with a value of 0 is similar to black, the shade with a value of 100 is close to white. The default value is 50. This command changes the shade value by a specified argument.
Each colour has a shade determined by a numerical value between 0 and 100. The shade with a value of 0 is similar to black, the shade with a value of 100 is close to white. The default value is 50. This command sets the shade value to a specified value.
Example:
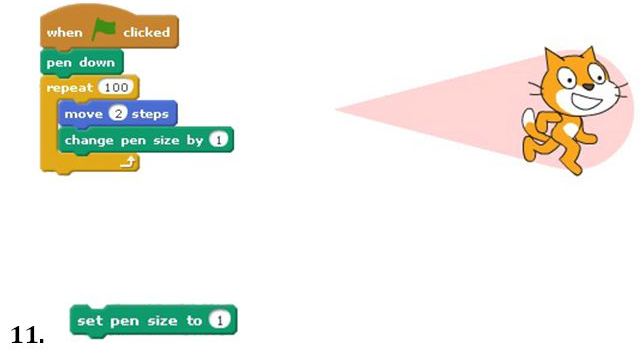
This command changes the pen thickness value by a specified argument.
Example:
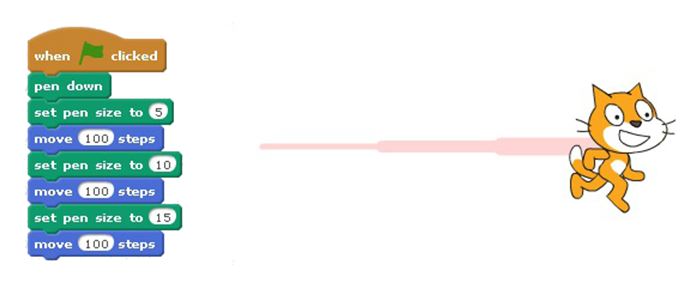
This command sets the pen thickness value to a specified value.
Example:
Data
The Data category contains buttons for creating variables. Once we have created our own variables, blocks will appear to be modified and use values. Variables allow us to store data. We can compare a variable to a drawer in which we hide something, we ask what is inside, we change the value. Scratch also uses variables, e.g. in the Motion category we can get the value of the coordinates of the sprite’s current position or of its direction.
If we have not created any variable of our own, there will be two buttons available in the Data category.
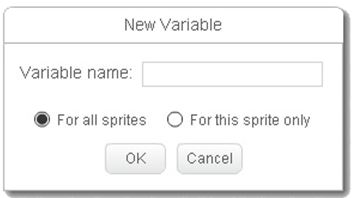
The second button, Make a list, is used to create variables to store more complex data, which we do not use in scenarios developed for classes for students in grades four to six as part of the “Masters of Coding” programme. We will use variables only to store numerical data. After clicking on the Make a variable button a dialog box will appear on the screen, as shown below. We need to specify the variable name and select its availability – whether the variable is to be available for all sprites (also for the stage) or only for a specific sprite (in this case other sprites cannot see that variable; they can also have a variable with the same name, but these will be different variables).
After confirming with the OK button blocks will appear to enable operations on variables.
The current value of the variable. It can be used as an argument in expressions. Checking the checkbox on the left displays the current value of a variable on the stage.
Example:
When we right-click in the block with the name of the variable in the data area we can select one of two options from the context menu: changing a variable name or deleting it.
Assigns the variable value. We can edit the default value, we can also insert an expression in its place.
Example:
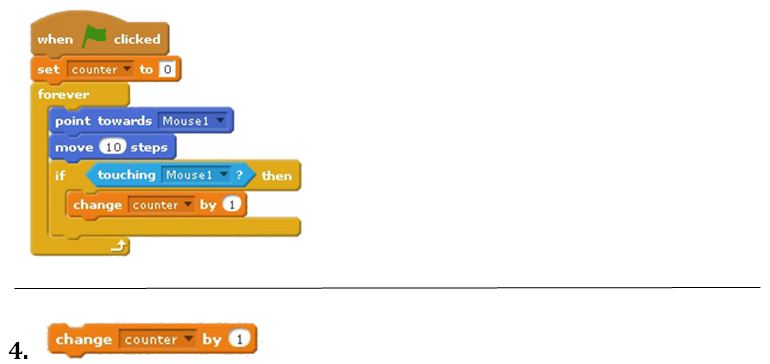
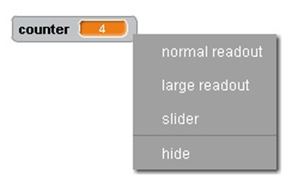
Changes the value of a variable by a specified value. In the example above, the variable counter is incremented by one every time the mouse sprite is touched.
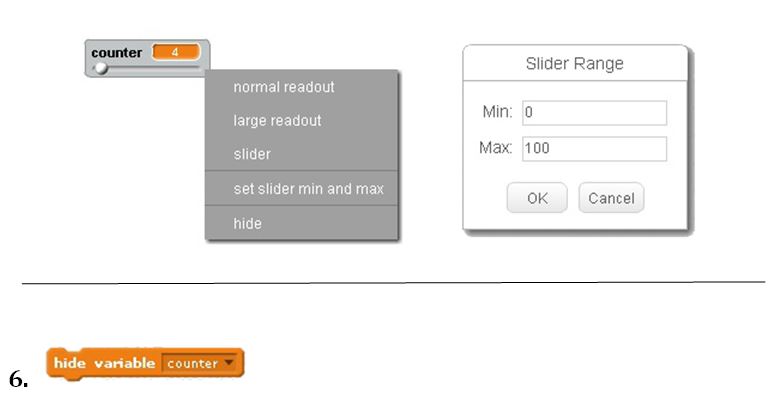
Displays the value of the variable on the stage. It works is the same way as when editing the variable name checkbox . When we right-click a variable on the stage, we can select a display method from the context menu.
“Normal readout” means the standard display – the current value of the variable including its name, and the possibility to edit the value. “Large readout" will display only the value (with the variable name) in large font, with a possibility of editing. Selecting the slider option displays an additional slider to change the value of the variable. The last option hides the display of the value on the stage. If the slider is displayed in the context menu, there is an additional option for selecting a minimum and maximum value for the slider.
Hides the display of the value of the variable on the stage. It works is the same way as when we edit the checkbox of the variable name to disable it.
Events
The Events category includes blocks which start scripts reacting to specific events (e.g. clicking a sprite with the mouse, pressing a key on the keyboard) and related to message support (self-generating events in the programme). Below is a description of almost all the blocks in this category.
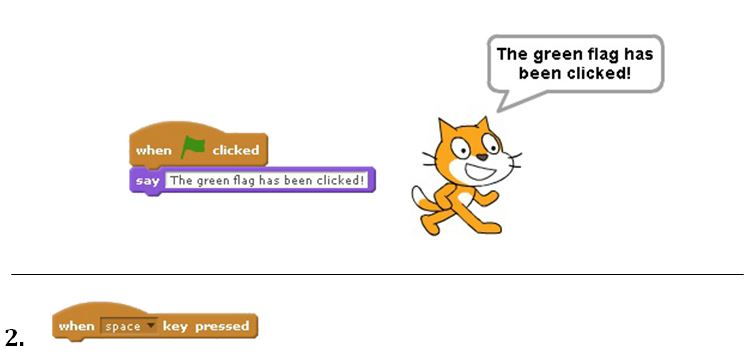
The basic block. It starts the majority of scripts. Scripts are run when we click the green flag on the screen – start the programme.
Example:
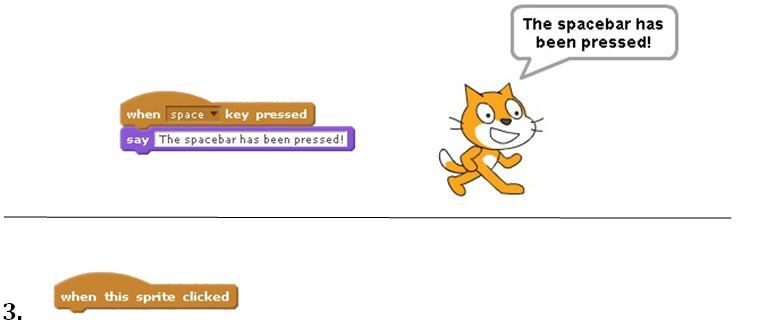
Runs the script after pressing a specific key on the keyboard. We select a key from a drop-down list.
Examlple:
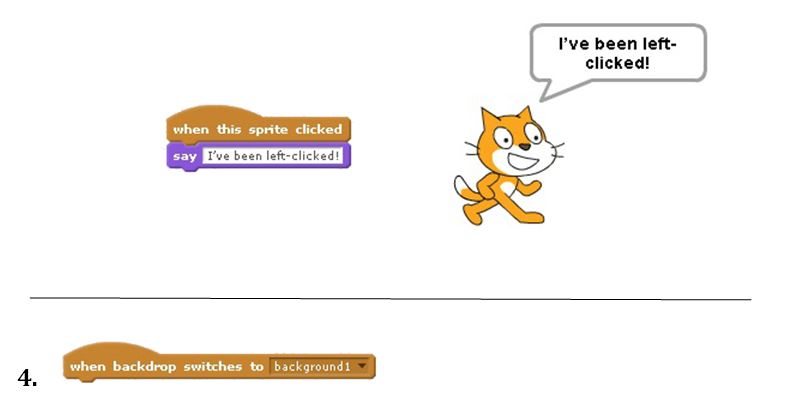
The block runs the script when we left-click the sprite.
Example:
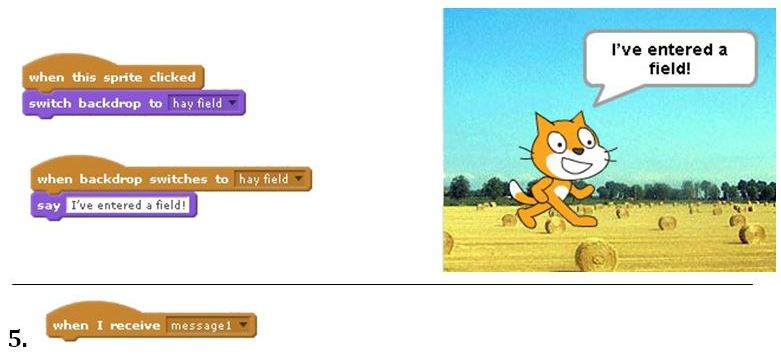
The block runs the script when a change of background occurs. The background name can be selected from a drop-down list. The script will be started when the background becomes the current one (displayed on the stage).
Example:
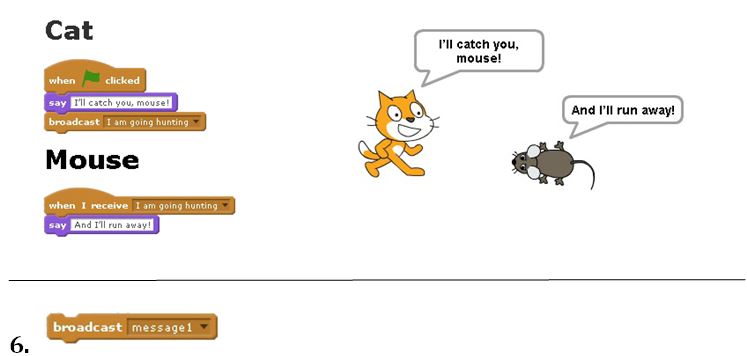
The block starts the script when a message of the specified name selected from the drop-down list is broadcast. We define the message in the broadcast message block. Broadcasting and receiving messages enables communication between sprites as well as the stage. In this way a sprite can run the script of another sprite.
Example:
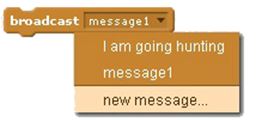
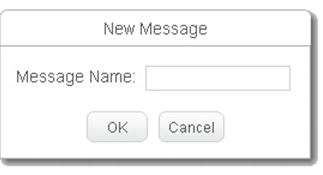
This block allows us to define and broadcast a message. We can choose the message name from the drop-down list or define a new message using the new message... option available when we expand the list.
A dialog box will be displayed then, in which we enter the name of the new message.
After the message has been broadcast (this block has been executed), scripts which start with when I receive message name blocks are automatically triggered. The script broadcasting the message is continued simultaneously. Example: See the description of the command when I receive.
Works in the same way as the block broadcast message name (see the description of that command). The difference is that the operation of the script in which the message was broadcast is paused until the end of the operation of all the scripts receiving this message.
Control
The Control category contains very important blocks – equivalent to instructions controlling programming languages (loops, conditional instructions). Below is a description of all the blocks in this category except for sprite cloning.
This block stops the script execution for a specified time. The default value can be edited.
Example:
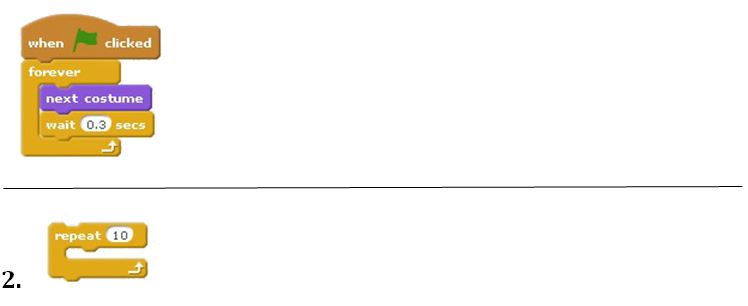
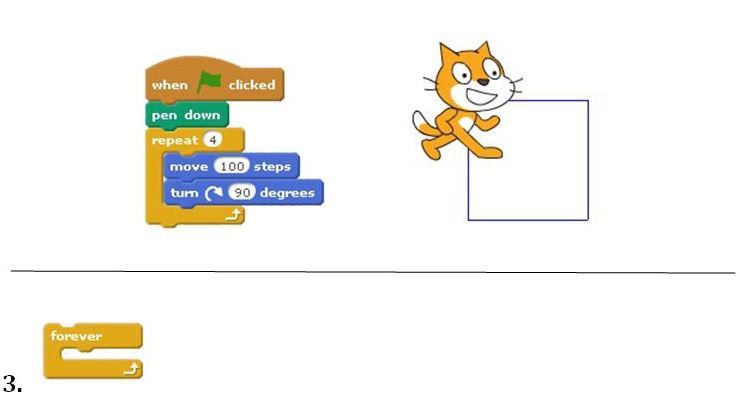
The block will repeat a set of instructions a specified number of times. The default number of repetitions can be edited.
Example:
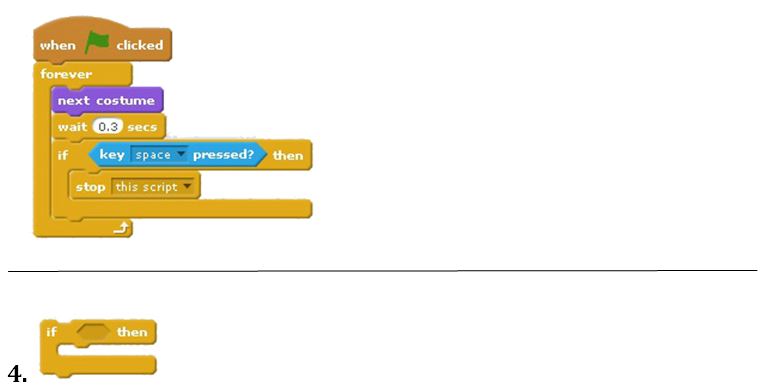
The block will repeat a set of instructions forever, until the interrupting button – the red circle – is pressed. If the script with the forever block is to stop by itself, a conditional instruction should be used inside it and the stop block.
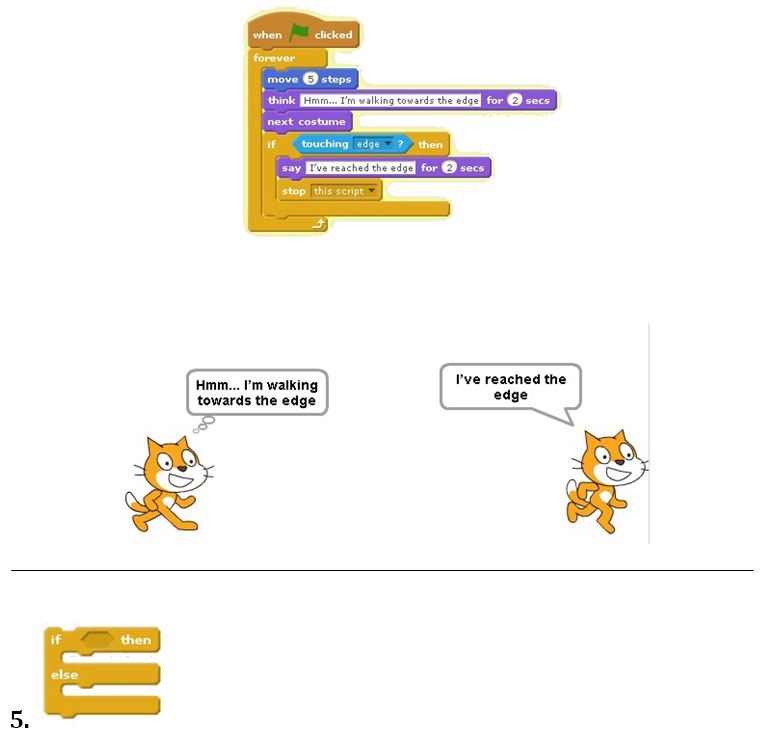
A conditional instruction block; a set of instructions will be executed once if a logical condition inserted after the word if is true. Conditions are built with the use of blocks of the Sensors and Operators categories.
Example:
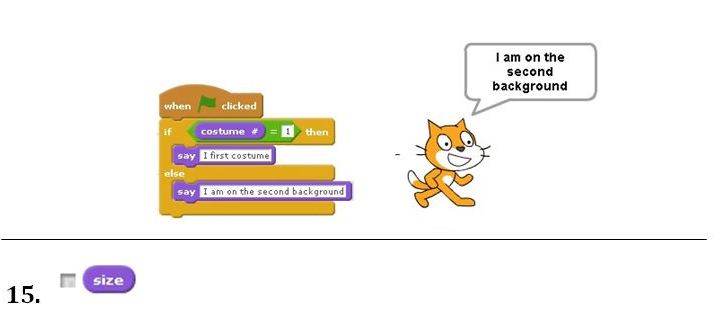
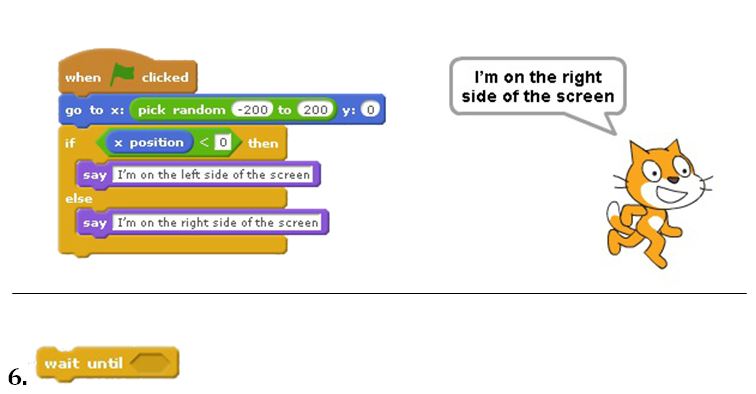
A conditional instruction block; a set of instructions will be executed between the words then and otherwise if a logical condition inserted after the word if is true. Otherwise, the set of instructions following the word otherwise is executed. Conditions are built with the use of blocks of the Sensors and Operators categories.
Example:
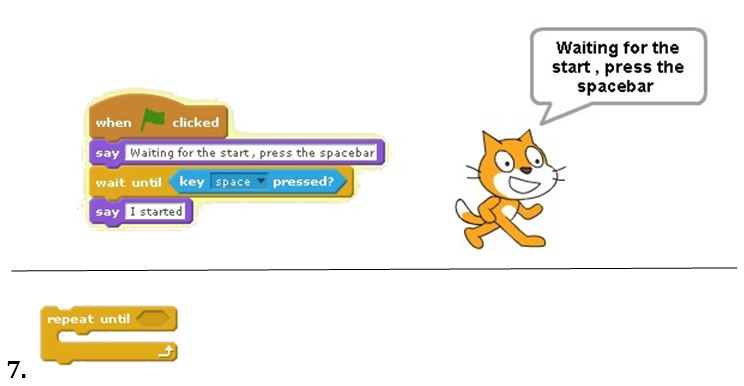
Suspends the script execution until the logical condition is fulfilled. Conditions are built with the use of blocks of the Sensors and Operators categories.
Example:
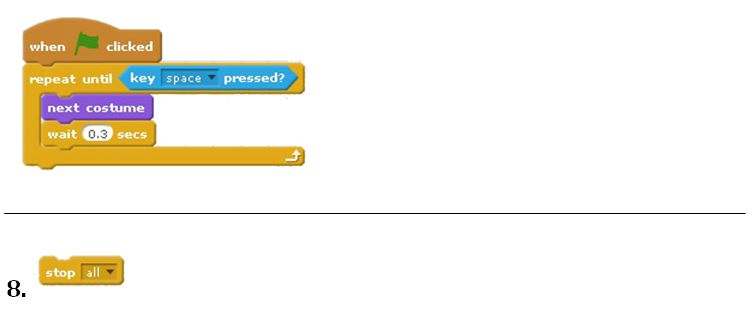
The block will repeat a set of instructions until the logical condition is fulfilled. Conditions are built with the use of blocks of the Sensors and Operators categories.
Example:
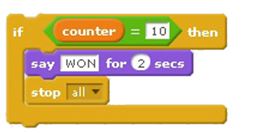
Stops the execution of a script or scripts. From the drop-down list we can select: stop the script in which a block has been placed (this script), stop all scripts of all sprites and scenes (all) or stop other scripts of the sprite with the exception of the script in which this block was started (sprite’s other scripts). Examples: see the description of the blocks forever and if.
Sensing
The Sensing category includes blocks related to the recognition of different situations that occur on the stage concerning, among others, sprites and the mouse, blocks to pull data from the keyboard, and blocks associated with the timer, date and camera. Below is a description of most blocks in this category, except for the camera operation and date blocks.
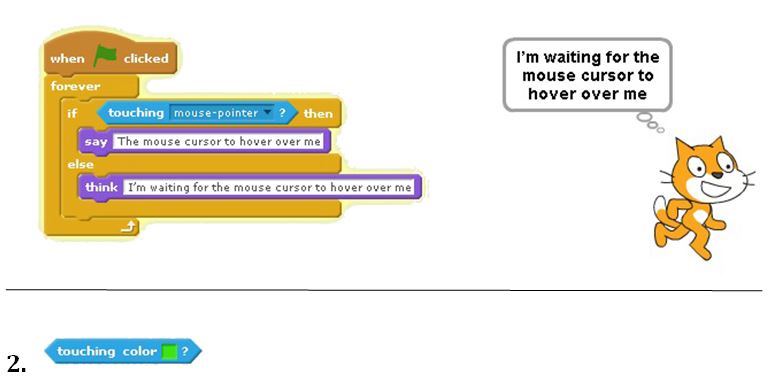
Checks if the sprite is touching the item selected from the drop-down list. This can be any other sprite, the mouse cursor or the edge of the stage. This block is used most often in conjunction with one of the following blocks: if, repeat until, wait until.
Example:
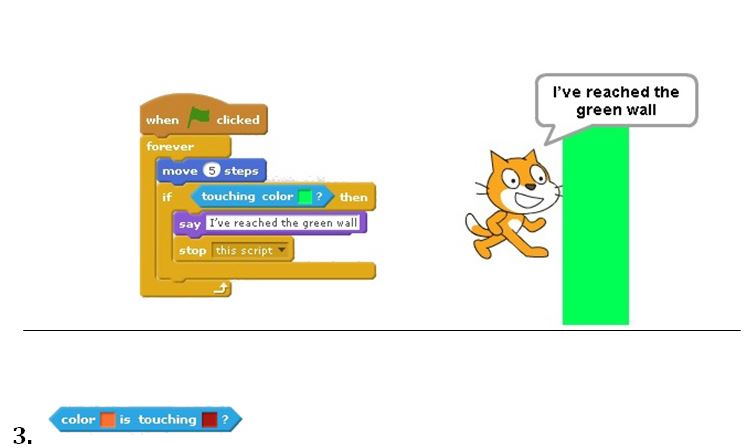
Checks if the sprite is touching a specified colour on the stage. To select a colour we should click the mouse in the box with the colour in the block, and then select the colour from the available colours using the mouse cursor. This block is used most often in conjunction with one of the following blocks: if, repeat until, wait until.
Example:
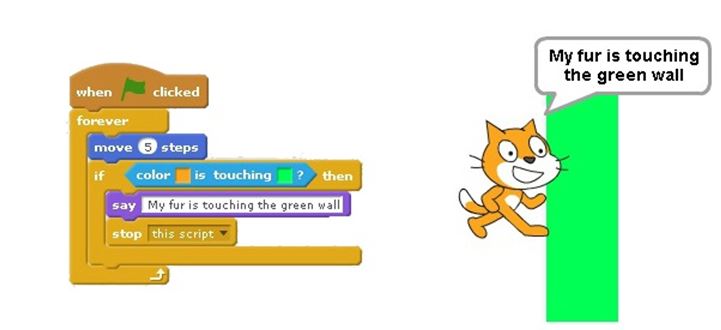
Checks if the selected sprite character colour is touching a specified colour on the stage. To select a colour we should click the mouse in the box with the colour in the block, and then select the colour from the available colours using the cursor. This block is used most often in conjunction with one of the following blocks: if, repeat until, wait until.
Example:
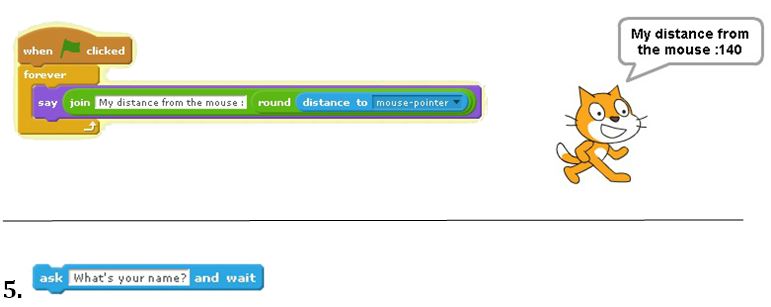
The current distance of the sprite from an item selected from the drop-down list – mouse cursor or another sprite. It can be used as an argument in expressions. The distance is measured from the centre of the sprite – we can set it by editing the costume.
Example:
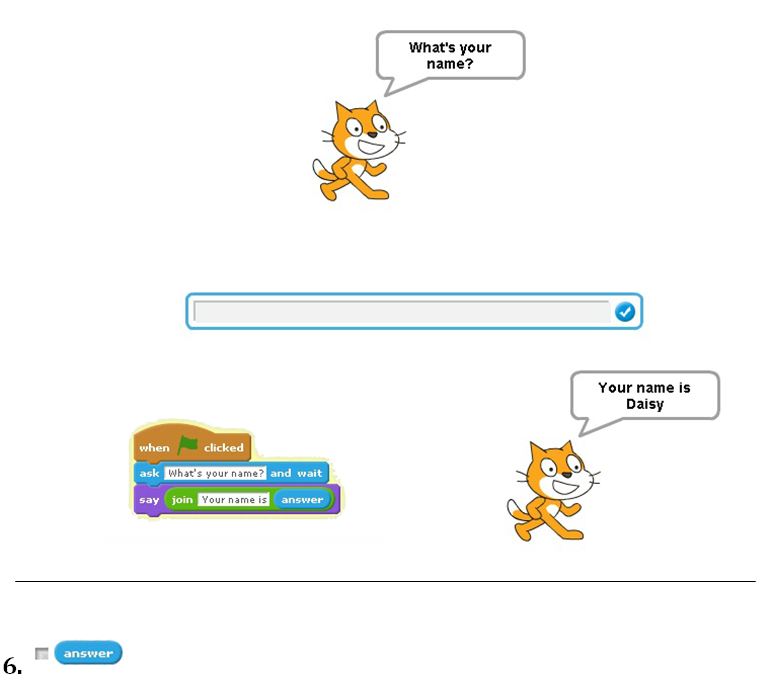
Displays in a bubble the text entered in the block box, as well as a window with an edit box on the stage. It waits for input of data in the edit field and confirmation by pressing Enter or clicking in the edit box. The information entered by means of the keyboard is available in scripts with the use of the block answer.
Example:
The answer provided by the user, as the result of the block Ask and wait. It can be used as an argument in expressions. Checking the checkbox on the left displays the answer provided on the stage. Example: See the description of the Ask and wait block.
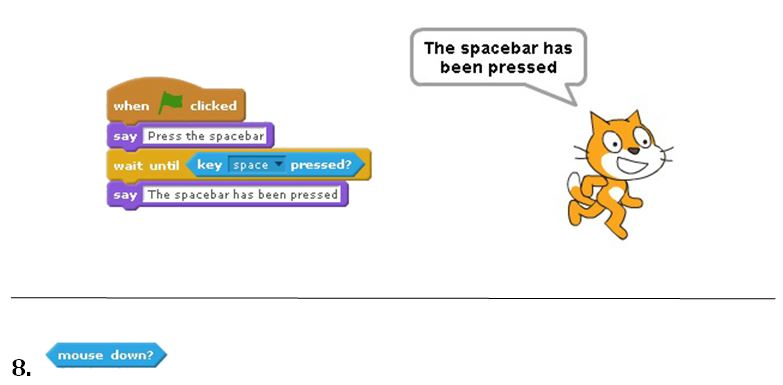
Checks if the key selected from the drop-down list has been pressed. This block is used most often in conjunction with one of the following blocks: if, repeat until, wait until.
Example:
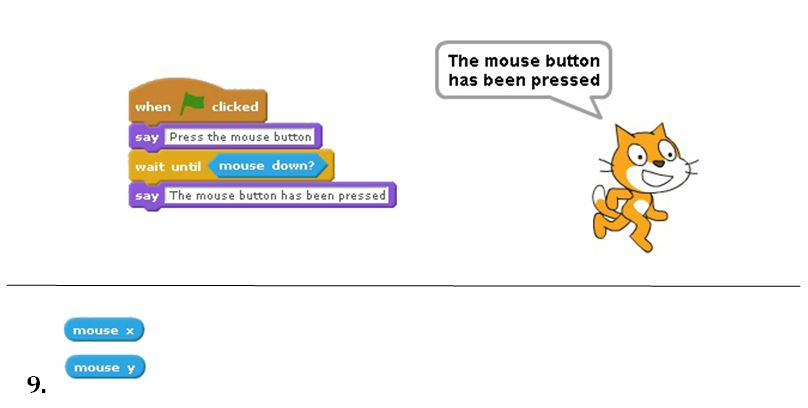
Checks if the left mouse button has been pressed. This block is used most often in conjunction with one of the following blocks: if, repeat until, wait until.
Example:
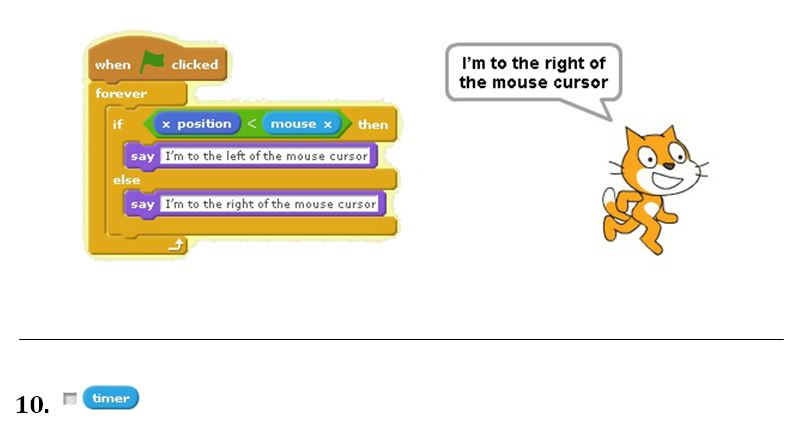
The current value of this x and y coordinate of this mouse cursor. They can be used as an argument in expressions. These coordinates are also displayed below the lower right hand corner of the stage.
Example:
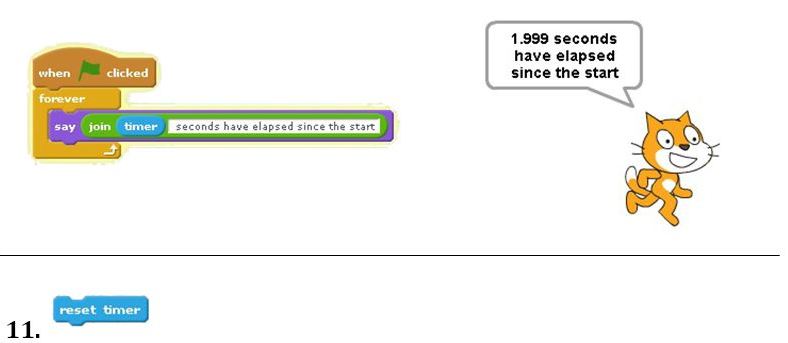
Current time in seconds since the last click of the green flag or execution of the block reset timer. It can be used as an argument in expressions. Checking the checkbox on the left displays the time on the stage.
Example:
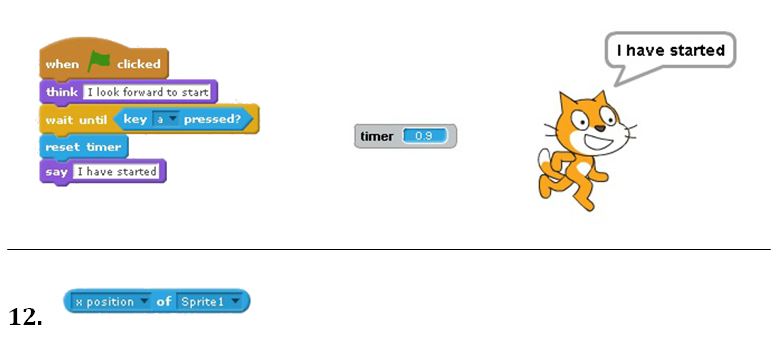
Resets the timer count. The values provided by the timer block will be counted from zero again.
Example:
The current value selected in the first drop-down list, pertaining to the sprite selected from the second list or the stage. We can select the x or y coordinate, direction, costume number, name or size. For the stage we can choose the number or the name of the background. The returned value can be used in expressions.
Example:
Operators
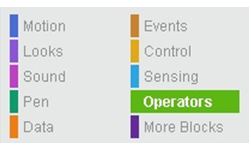
The category of Operators groups blocks of basic arithmetic operations, logical operations and various functions (both arithmetic and on texts). All blocks in this category are used as arguments for other blocks. Below is a description of most blocks in this category.
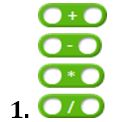
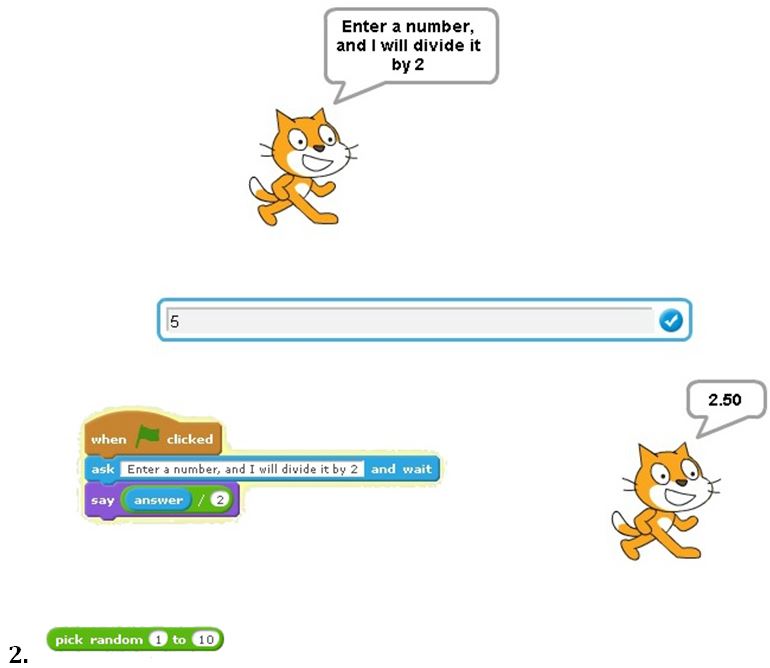
Blocks of the four basic arithmetic operations (addition, subtraction, multiplication, division). In the edit boxes arguments should be provided (which may be manually entered numbers, the value of a variable or the result of another action, so blocks can be embedded). A built arithmetic expression should be used as an argument for another block, e.g. to determine the value of a variable or a logical expression.
Example:
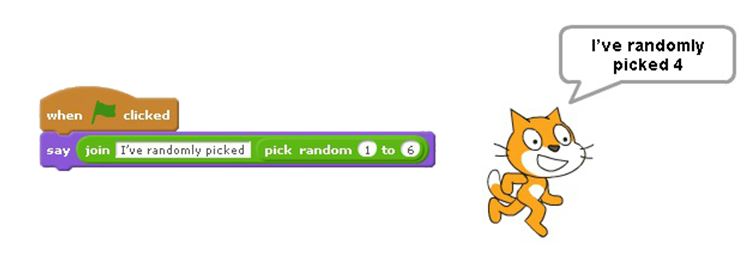
Draws a number from a specified range. In the edit box we should specify the lower and upper range of the random number to be picked. The block should be used as an argument for another block.
Example:
Comparison blocks (less than, equal to, greater than). In the edit boxes we should specify values to be compared. We can enter specific values in the edit fields, most often one of the arguments is the value of a variable or a value read with the use of another block (e.g. a coordinate of a sprite’s position on the stage). This block is used most often in the following instructions: if, repeat until, wait until.
Example:
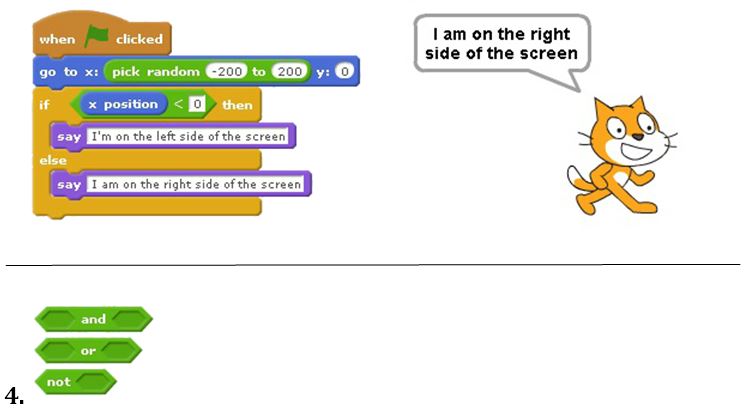
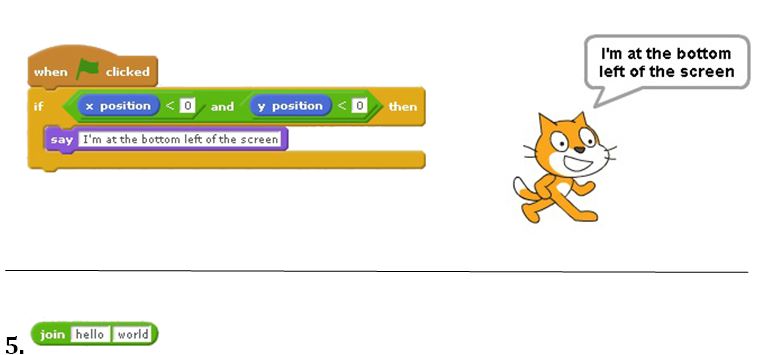
The blocks used to build complex logical expressions (conjunction – both conditions are true, alternative – one of the conditions is true, negation – contradiction). Insert the matching blocks returning Boolean values (true or false) in argument boxes. Blocks are used most often in the following instructions: if, repeat until, wait until.
Example:
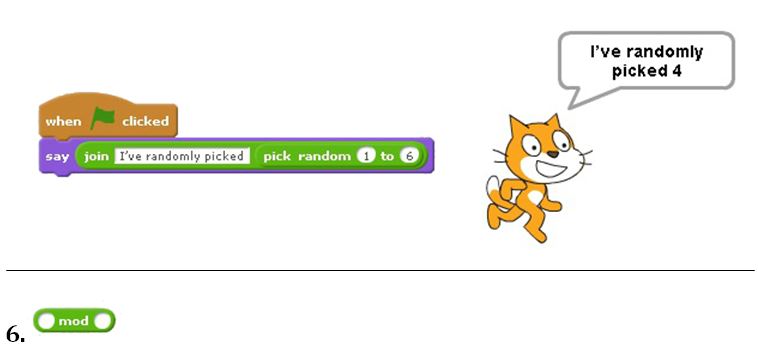
The block is used to connect two strings of text into one. Usually one of the arguments is the entered text, and the other a value returned by another block. The block is often used as an argument in the say and think blocks.
Example:
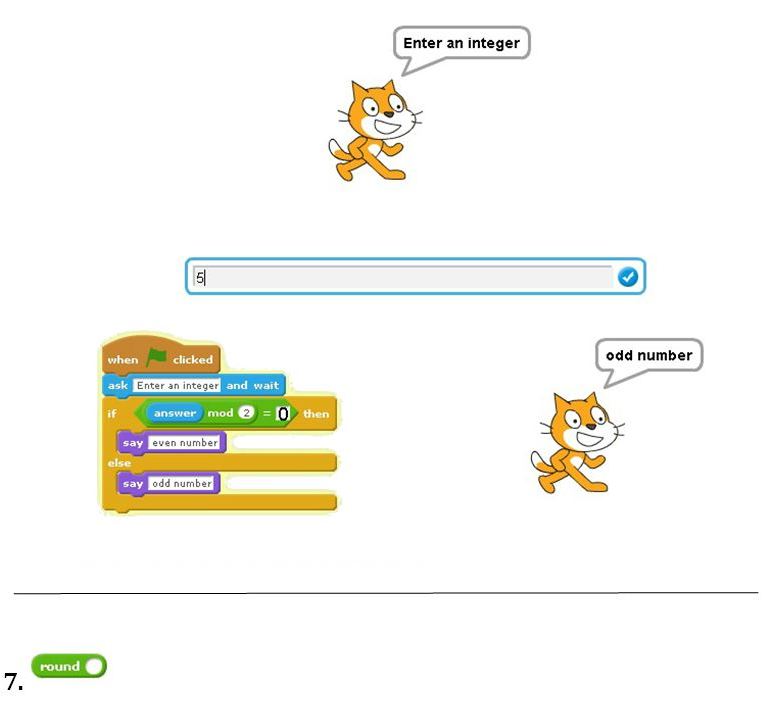
The value is the remainder of the division of the first argument by the second. The block is often used as an argument in arithmetic and logical operations.
Example:
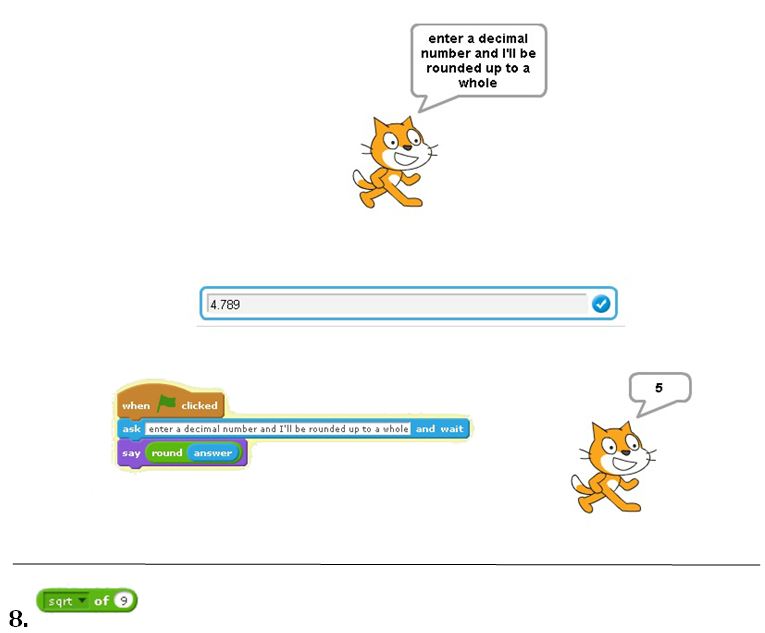
The value is the argument rounded off to the nearest integer – according to rounding rules, i.e. 0.5 and more is rounded up, otherwise down. The block is often used as an argument in other blocks.
Example:
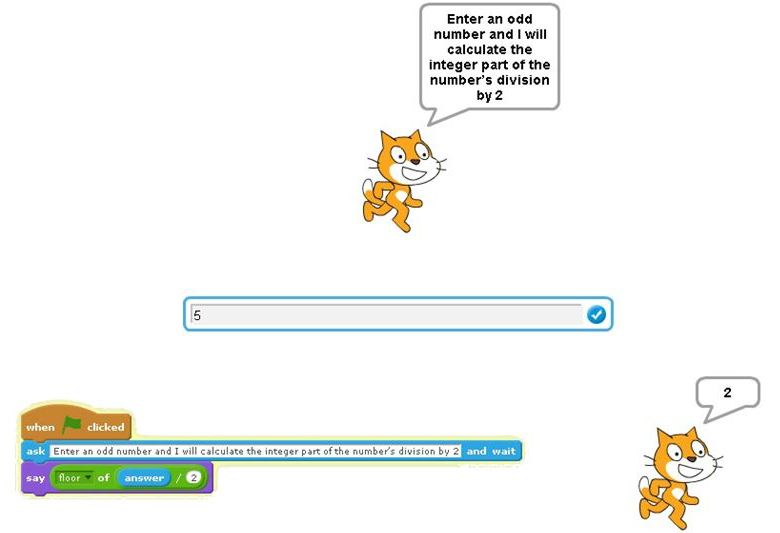
The value is the result of the function selected from the drop-down list for the argument specified in the edit box. From the drop-down list we can select the following functions:
The block is often used as an argument in other blocks. Functions such as floor (always round down) and ceiling (always round up) may require explanation.
Example:
Stage blocks
The stage, like sprites, can have its own scripts. To create scripts for the stage we need to select it as the active object in the bottom right corner of the screen – the area for managing sprites and the stage. The choice of available blocks will change then – many of them apply only to sprites and may not be used in stage scripts. Differences are described below.
- The Motion category
There is no block in this category, the stage cannot be moved or rotated.
- The Looks category
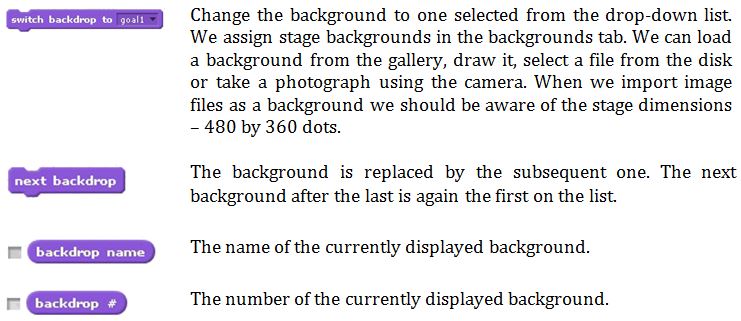
Most changes are in this category. The stage can have multiple backgrounds, just like a sprite can have multiple costumes. There are blocks associated with the change of background and information about the selected background. The most important of these are the following:
- The Sounds category
The blocks are the same, but when we play audio files they relate to the sounds assigned to the stage in the Sounds tab.
- The Pen category
In this category, there is only one block for the stage – clear.
- The Data category
The same as for sprites. The only difference is that we can only create variables available for all sprites.
- The Events category
The same blocks as for sprites.
- The Control category
The same blocks as for sprites.
- The Sensing category
The same blocks as for sprites. There are no blocks for sprites interacting with other objects and colours (is touching, is touching the colour, the colour is touching the colour, distance from)
- The category Events
The same blocks as for sprites.

