Module 5 - The “Bounce the Ball Arcade Game” Project
These materials have been developed by Ośrodek Edukacji Informatycznej i Zastosowań Komputerów (Centre for Information Technology Education and Application of Computers) in Warsaw as part of the “Mistrzowie Kodowania”(“Coding Masters”)Programme funded by Samsung Electronics Polska, licensed under CC BY-SA “Attribution – Share Alike 3.0”.
Spis treści
- 1 Information
- 2 Stages
- 2.1 Discussion of selected solutions of module IV additional tasks
- 2.2 Designing and implementing a game involving hitting a ball with a racket controlled by the player using a computer mouse
- 2.3 Modifications to the programme – adding the Game Over board
- 2.4 Discussion of additional tasks and tasks for self-completion
Information
Objectives
General objectives:
- Review and revision of previously presented Scratch commands and language structures;
- Introduction of the message mechanism in the Scratch environment;
- Development of an arcade game outline;
- Implementation of the game in the Scratch environment.
Specific objectives:
- The student will understand and be able to use appropriate structural instructions.
- The student will understand the concept of variable and be able to use it in the programme.
- The student will be able to send messages and programme reactions to a received message.
- The student will be able to use stage backgrounds.
- The student will understand how events work and know how to use them in the programme.
- The student will be able to implement a simple arcade game in the Scratch environment.
Stages
Discussion of selected solutions of module IV additional tasks
Time to complete this part: about 15 minutes
At the beginning of the lesson we remind the students what they were supposed to prepare between classes. We invite a volunteer to present his/her solution. We discuss with the students if anyone found a different solution. We discuss the solutions (we praise every correct solution to a task).
If there was no homework, we start by repeating key issues from the previous module. We also ask if students have any doubts about their own projects. If anyone wants to show something he/she is proud of, we allow him/her to do so.
Designing and implementing a game involving hitting a ball with a racket controlled by the player using a computer mouse
Time to complete this part: about 45 minutes
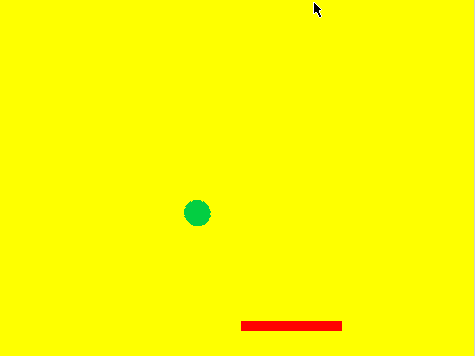
We propose to create an arcade game which will involve hitting a ball using a racket controlled with the use of a computer mouse. We will start with the simplest version and then supplement it with additional elements – including a version of the game for two players controlled with the use of the keyboard.
We sketch a drawing on the board next to which we will be able to write algorithms of actions of individual sprites and what we need to do to make our game work.
We ask the following question: What should the ball and the racket be?
Students will probably quite quickly answer that both the racket and the ball should be sprites which we will be able to control. If necessary, they should be prompted to come up with this answer, justifying this rather than any other choice.
Task: We ask the students to change the sprite’s name to Racket, and then draw a racket costume for it. Next, they should add a new sprite, name it Ball, and draw it a suitable costume as well. We allow a few minutes to complete this task.
Together with the students we analyse and write the algorithm for the sprites: Racket and Ball.
We ask the following question: Where should the Racket sprite be placed after the programme is started? How should it move? How can it be simply controlled with the computer mouse?
E.g. on the line where it will move. Additional question: what must we set? – Y coordinate. To what value? – One corresponding to the bottom part of the screen, e.g. 150. The X coordinate can be set to any value or to 0 if students come to such a conclusion. It is worth noting the findings on the schematic drawing on the board.
The answer to the second question may be a little more complicated. Students should remember from modules two and three how to control a character using the mouse. It is worth discussing how the racket should move (just left–right if the board we adopted is as in the example). Therefore we ask: Which coordinate will be constant (Y) for the racket, and which will vary (X)? We ask the students to find a block which will allow to move the racket the quickest in accordance with the movement of the computer mouse. Students should find two blocks which will work well together: Set x to <0> and x mouse.
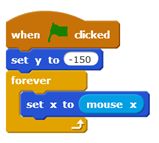
Together with the students we write the algorithm for the Racket sprite on the board :
- When the green flag has been clicked
- Set the Racket at the bottom of the Stage (e.g. Y=-150)
- Always
- Set x to <mouse x>
Task: We ask students to add a script for the Racket, and then test whether the racket moves as desired. We allow three to four minutes to complete this task.
A sample script might look like this:
We ask subsequent questions leading to the determination of all relevant points of the Ball sprite algorithm (we write down the findings on the board, e.g. on the schematic drawing): 1. Where should the ball be placed after the programme is started? 2. In which direction should it be placed? 3. How can we control the speed of the ball, how fast should it move? 4. What should happen when the ball reaches the edge of the screen? 5. What should happen when the ball touches the racket? 6. What should happen when the ball fails to touch the racket and passes behind it?
Various answers may be provided. We should collect and discuss them and propose some output data. For example:
- It is best when the ball starts to move from the centre of the screen (Y=0). The initial value of X may be any value (e.g. randomly selected from the range between -200 and 200).
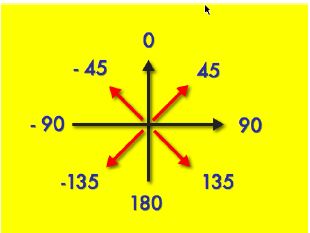
- Setting the angle of the ball’s direction to 45 degrees, i.e. top right, will allow the player to figure out how to control the racket. At this point it is a good idea to revise directions with students – an angle of 0 degrees is the direction upwards, then we move clockwise, so an angle of 90 degrees is the direction to the right. Thus an angle of 45 degrees will direct the ball diagonally upwards and to the right. In discussing the value of each angle we can use the following illustration.
- Setting the ball speed to 5 steps, which will ensure that the initial speed will not be too high. This will determine the game’s level of difficulty. Afterwards we can experiment with this parameter.
- The ball should bounce off the wall (the bottom edge will be an exception, because the ball should not reach it).
- The ball should bounce off the racket producing a bouncing sound.
- When the ball misses the racket, the game should be over – e.g. the words Game over! should be displayed.
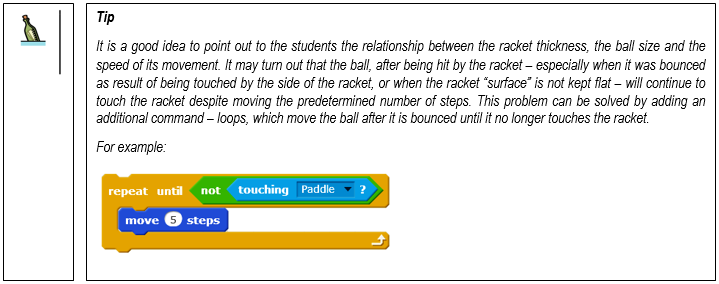
We ask the following question: Which of the listed actions are we able to programme? What raises our doubts? Together we look for blocks which can be useful in solving specific problems. The students already know most of the blocks necessary for programming the described game. When it comes to new ones, a few movement blocks may come of use – in particular:
- bouncing off walls,
- checking the direction in which the ball is currently moving,
- we should discuss with the students how we can tell that the ball has gone past the racket. We can guide them by asking what we are able to control in the case of the ball. They will arrive at the answer that, among others, the X and Y coordinates. Next, if necessary, we can ask what the value of the coordinates is for the racket. X is changeable, and Y determines the height of the stage at which the racket moves. Previously we have found that Y for the racket is -150, so if the Y coordinate of the ball is less than -150, this means that the ball has gone past the racket.
Students’ task: We ask the students to think about and write down (individually) on a piece of paper the algorithm (rule) determining the actions of the Ball sprite. We allow them a few minutes to complete this task.
Together with the students we write down the algorithm on the board and take this opportunity to clarify any doubts.
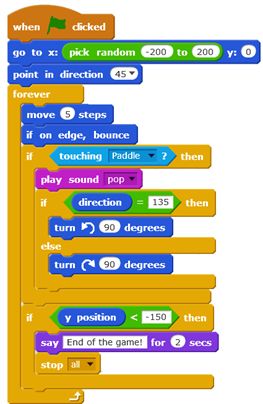
Sample algorithm for the Ball sprite:
- when the green flag has been clicked,
- set the ball at mid-height of the Stage (Y=0) with determining the X coordinate by means of a draw,
- set the ball direction at 45 degrees (upwards and to the right),
- always:
- move the ball by 5 steps,
- if it is touching the edge of the stage, bounce it off,
- if it is touching the racket:
- play a bounce sound,
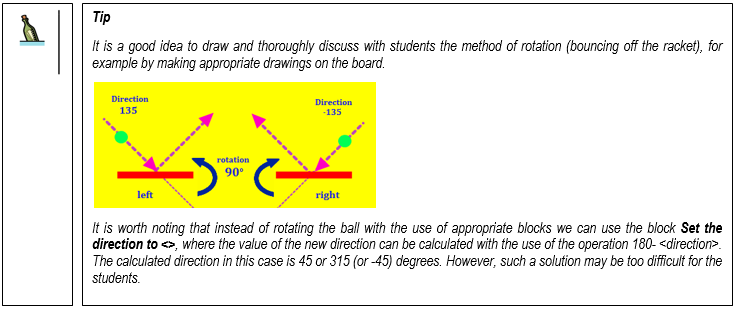
- if the direction is: to the right and downwards (direction=135 degrees)
- rotate by 90 degrees to the left
- otherwise
- rotate by 90 degrees to the right
- if the Y coordinate <-150, then:
- say “Game Over”,
- end the script.
Task: We ask the students to create and test the Ball sprite script according to the jointly developed algorithm. Students work individually. We keep an eye on their progress and, if necessary, provide individual help. We can ask the students who finish quicker to help others (if they can explain to them where mistakes have been made rather than complete the task for them) or give them tasks from the list of additional tasks.
A sample ball script may look as follows:
Modifications to the programme – adding the Game Over board
Time to complete this part: about 15 minutes
We ask the students how they like the way the programme works. They will probably notice that the words ending the game cannot really be seen by the player because they disappear very quickly from the screen. We propose to make a change. In the majority of games, the game over board is different than the board visible during the game. We propose the following modification: 1. Creation of an additional background for the stage with GAME OVER written on it in large letters. We propose that students name it The End. At the same time the first stage background can be named The Game. 2. We suggest making use of sending and receiving messages. We ask the students to find appropriate blocks:
3. We ask them to introduce the following modifications:
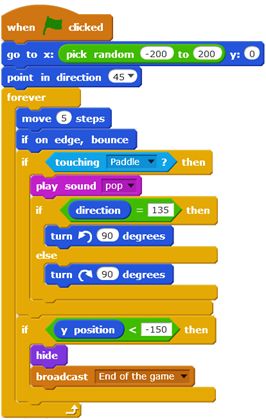
- In the ball script
- add the show block operating after the programme has been starts with the green flag,
- modify the script so that instead of displaying Game over:
- a message called Game over is displayed,
- the Ball sprite is hidden.
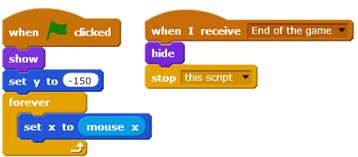
- In the racket scripts
- add a script responding to receiving the Game over message by hiding the Racket sprite
- add a block showing the Racket sprite after the programme has been started with the green flag.
- In the stage scripts
- when the programme has been started with the green flag: set the background to the one named The Game,
- add a script responding in the following manner to receiving the message Game over:
- change the background to the one named The End,
- terminate the operation of all scripts.
Task: We ask the students to introduce the discussed modifications to the programme and test it. We allow a few minutes for students to complete the task.
Individual scripts can look like this:
The ball script:
The racket scripts:
The stage scripts:
Discussion of additional tasks and tasks for self-completion
Time to complete this part: about 15 minutes
Below is a list of proposed modifications for the game we have discussed. Depending on the time remaining after the completion of previous parts, we can implement them in class or propose their completion at home. Students can choose from them the ones they would like to develop. It is worth presenting and discussing the briefly at the beginning of the next module. It is a good idea to present different solutions to the same problem as suggested by individual students.
The proposed list of additional tasks:
- Speeding up the game after each bouncing of the ball
The ball speed should be increased by one step each time it is bounced off the racket. For this purpose a variable, e.g. Speed, should be created and used.
- Adding a number of lives (e.g. three) for the player controlling the racket
A life counter in the form of a variable should be used and modified accordingly depending on lives lost (failures to bounce the ball).
- A version of the game for two players, controlling two rackets using the keyboard (e.g. the first player uses A and Z keys, the second player K and M keys). Here it is worth remembering about such modifications as:
- racket settings (left and right sides of the screen are more convenient),
- change of the ball script (reaction to two rackets),
- change of the ball script (the possibility of a victory of the first or the second player – detecting when the ball is out of the game field, depending on which racket was bypassed by the ball).
- change of the board ending the game so that it informs us which player has won,
- adding a board informing us about the rules of the game,
- adding a game score counter showing points scored/lost by a given player and new rules – e.g. the first to lose the ball 5 times loses the game.

